
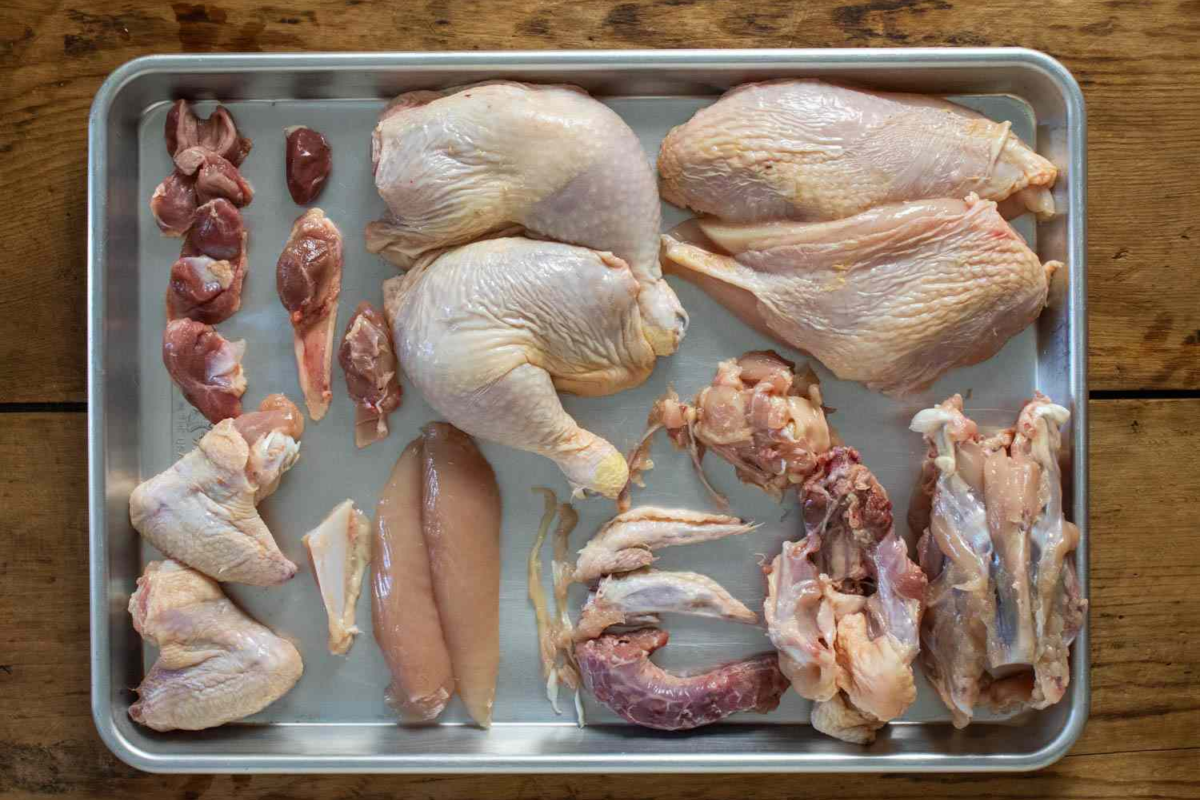
The French have a name for two of the best bites on a chicken: sot-l’y-laisse, “the fool leaves it there.” In English we call them the oysters. They’re a pair of small, round nuggets of dark meat tucked into two little hollows on the bird’s back, right above the thighs. They’re tender, juicy, and richer than anything else on the chicken, and most people have never eaten one. That’s because most people don’t know they exist. They carve the breast, pull off the legs, and toss the carcass in the trash with the two best bites still stuck to it. The cooks who know better have kept quiet about it for a long time. In a lot of kitchens, the oysters never make it to the plate. They’re the cook’s reward, eaten standing at the cutting board by whoever broke down the bird. In Japan, yakitori shops sell them as their own skewer, called soriresu, a name borrowed straight from the French. So that’s how much they’re worth. Leave them behind and French cooks will mock you mercilessly, and honestly, I will too.
The oysters are a good test of everything in this lesson. You can’t hack a chicken apart and find them by accident. You have to know where the joints are, where the bones are, and where your knife needs to go. Getting a chicken ready for the heat takes some practice and some careful prep: breaking it down, boning it, trussing it, brining it, and stuffing it safely when you need to. Every bit of it is very doable, and once your hands learn the bird, you’ll never leave the oysters behind again.


How to Remove a Wishbone
Instructions
- Locate the V-shaped wishbone in the center of the chicken’s breast plate.
- Pull back the breast meat and slide your knife tip across the wishbone.
- Repeat on both sides of the wishbone.
- Slide your thumb and index finger up to the tip, where the wishbone meets the breastplate.
- Snap the wishbone loose and gently peel out.
Fabricating Poultry
Fabricating a bird means three things: disjointing it (taking it apart at the joints), boning it (separating the meat from the bone), and cutting it into pieces you can actually cook. All you need is a clean board, a boning knife, and a chef’s knife. Not every bird gets broken down. Lots of bigger birds get roasted whole (like Thanksgiving turkeys!). But every cook needs to know how to take a chicken apart. You can’t really call yourself a cook if you can’t bone out a breast.
Know the Bird Before You Cut It
Good fabrication is mostly anatomy. A chicken comes apart at its joints, and a cook who knows where they are can break down a bird in a couple of minutes and waste almost nothing. Newbies? You can identify them by all the hacking and chopping and sawing and cursing. Learn to do it right so nobody calls you a newb.
Four-Piece Breakdown
Wing tips and wishbone
Step 1: Trim the wing tips.

Cut straight through the joint at each wing tip. Save the tips for stock.
Step 2: Remove the wishbone.

At the neck opening, peel back the meat with your fingers until you can see the thin arms of the wishbone. Run the tip of your knife along each arm to free it from the breast meat. Work your fingers behind the wishbone, hook the top where the arms meet, and pull it out. Save it for stock.
Remove the leg quarters
Step 3: Cut the skin.

Pull the leg away from the body until the skin is tight, then slice through the skin between the leg and the body. Cut only the skin, nothing deeper.
Step 4: Pop the joint.


Bend the thigh back and away from the body until the ball joint pops out of its socket. It shouldn’t take much force.
Step 5: Cut through the joint.

Cut through the exposed joint.
Step 6: Take the oyster with the leg quarter.


Finish the cut with your knife close to the backbone so the oyster comes off with the leg. The oyster is the nugget of dark meat in the hollow of the back, the sot-l’y-laisse: “the fool leaves it there.” Repeat Steps 3–6 on the other leg.
Separate the breast and back
Step 7: Cut through the ribs.

Stand the bird on end, tail up. Cut through the skin and cartilage where the breast meets the back, then keep going through the ribs with short, firm strokes. Use a heavy chef’s knife, a cleaver, or a honesuki.
Step 8: Cut the other side.

Repeat on the other side of the bird.
Step 9: Cut through the shoulders.

Cut through the shoulder bone on each side.
Step 10: Remove the back.

Pull the back away from the breast. Save it for stock.
Step 11: Cut along the breastbone.

Lay the breast skin side down and cut along one side of the breastbone.
Step 12: Crack the bone.

Press down hard on the blade until it cracks through the bone. You now have two breast quarters with the wings attached and two leg quarters.
To finish fabricating the chicken into eight cookable pieces, separate each leg quarter into a thigh and drumstick, then remove the wings from the breast quarters. Here’s how:
Eight-Piece Breakdown
Step 13: Split the leg.

Lay the leg skin side down and find the fat line between the thigh and the drumstick. Cut down that line, straight through the joint.
Step 14: Set up the breast quarter.

Lay the breast quarter skin side up with the wing toward you.
Step 15: Find the wing joint.

Lift the wing and cut into the joint where it meets the breast.
Step 16: Remove the wing.

Cut through the joint to take the wing off. Repeat Steps 13–16 on the other leg and breast quarter.

Nothing Goes in the Trash
Every part of a broken-down bird has a job. The backbone, neck, and wing tips go into the stockpot. Trim scraps become ground chicken or forcemeat. Extra fat and skin get rendered down into chicken fat, which Jewish cooks call schmaltz, and it’s been making food taste better for centuries. The only things that should actually hit the trash are true waste: blood clots, bruised spots, and stray pinfeathers. Sorting your trim this way is how breaking down your own birds actually saves money (see Fresh Doesn’t Mean What You Think: Buying, Receiving, and Storing Poultry).
Safely Storing and Fabricating Poultry
Raw chicken is the most dangerous thing in your kitchen, so treat your cutting station like a crime scene you have to clean up afterward. Clean and sanitize your board and every knife before you start and again when you finish. Wash your hands with soap and warm water going in and coming out. Don’t pull a whole case of birds out of the cooler and let them sit on the counter while you work through them. Work in batches, and keep everything you’re not cutting in the refrigerator. Store the finished pieces in leak-proof containers at 41°F or lower, on the bottom shelf, below ready-to-eat food, meat, and seafood.
Why Truss?

An untrussed chicken in the oven looks like it’s doing jumping jacks. The legs splay out, the wings flop open, and every part sticking out into the hot air cooks faster than the rest, so the wing tips and drumsticks are drying out while the thick breast is still catching up. Trussing ties the legs and wings tight against the body. A tight, compact bird roasts and browns evenly, holds on to more of its moisture, and is a whole lot easier to carve.
How to Truss a Chicken
Instructions
- Take a piece of butcher’s twine and snuggle it underneath the pope’s nose, like a sling. The pope’s nose, or pygostyle, is the protruding fleshy "tab" at the posterior end of a chicken between the legs. Some people think that is the neck.(They're very wrong). Cross the twine OVER both leg joints.

- Reverse direction and slide the twine UNDERNEATH both leg joints, creating a wrap – a figure eight surrounding the legs.

- Slip the twine UNDER the chicken breast and pull back. When you pull, the legs should pull together and towards the breast side in a tidy package.

- Pull the twine towards the back of the chicken while at the same time you use your thumbs to pull the breast skin down towards the cavity. Make sure the skin is smooth and taut and that the twine is going OVER the wings, holding them against the side of the bird.

- While holding the twine firmly in place, make a simple slip knot to tighten.
- Use a butcher's knot to keep the trussed bird together. Trim any unused twine.


Brining Poultry
Brining is just soaking the bird in salt water, usually with some aromatics thrown in. While it soaks, the meat soaks up extra water and salt, and the salt loosens up (denatures) the proteins so they hang on to that water when the heat hits. You end up with chicken that’s juicier and seasoned all the way through, not just on the surface. It’s the best insurance there is for lean cuts that love to dry out, and you already know which part of the chicken that is.
How to Brine Poultry
Ingredients
- 2 quarts water
- ½ cup kosher salt
- 2 lemons quartered
- 10 sprigs parsley
- 7 sprigs thyme
- 2 sprigs rosemary
- 3 bay leaves dried
- ¼ cup honey
- 6 garlic cloves peeled and smashed
- 1 tbsp black peppercorns crushed
Instructions
- Pour 2 cups of water into a sauce pan along with remaining Brine ingredients.
- Bring to boil for 2-3 minutes, stirring to dissolve salt.
- Remove from heat and steep for 15 minutes.
- Cool to below 70*F before using
- Add 1 quart of water and chilled brine base to a container large enough to hold chicken. Stir. Add chicken, breast and leg side DOWN.
- Add just enough water to submerge.
- Cover and refrigerate for 12 – 24 hours
- Remove from brine, rinse well, pat dry, and leave in refrigerator for at least a couple hours to dry further for crispy skin.
Notes
- SMALL MEATS (Like a whole chicken)
- 4-6 hours, chicken 1/2 cup salt per quart water
- 6-14 hours (overnight), chicken 1/4 cup salt per quart water
- LARGE CUTS (LIKE A PORK ROAST OR TURKEY)
- 24 hours 1 cup salt per gallon water
- 48 hours 1/2 cup salt per gallon water
Wet Brine or Dry Brine?
The brine recipe above is a wet brine, and the most important step isn’t the soak, it’s what happens after. Once the bird comes out of the brine, it goes back in the refrigerator uncovered so the skin can dry out, because wet skin won’t brown or crisp until all that water is gone.

A dry brine skips the bucket entirely. You just salt the bird, about 1 teaspoon of kosher salt per pound for a whole chicken, inside the cavity and under the skin of the breast and legs. Set it on a rack over a sheet pan and leave it in the refrigerator uncovered for 6 to 24 hours. It looks like nothing’s happening, but a lot is. First the salt pulls juice out to the surface. Then the salt dissolves into that juice, and the salty liquid soaks back into the meat, seasoning it and loosening up the proteins so they hold on to more of their own juice in the oven. The whole time, the cold, dry air in the refrigerator is drying out the skin for you.
So which one? A wet brine puts more water into the meat. A dry brine takes up a lot less room in the walk-in and gives you drier skin. Either way, the skin has to be dry before it can crisp, and the reason why is in The Juices Lie: Cooking Poultry, Method by Method.
Stuffing a Bird Safely
Stuffing – or dressing, if your grandmother’s from the deep south- is a mix of bread crumbs, herbs, and other ingredients cooked inside a roasting bird. It tastes great! It cooks slowly, and as the bird gives up its delicious juices, they soak into the stuffing and make it just…. Magical. Stuffing has a problem, though: it’s a perfect little incubator for harmful bacteria.
The center of a bird is the slowest-heating spot there is, and the stuffing is sitting in there soaking up raw chicken juice the whole time. On a large bird, the breast can hit 165°F while the stuffing in the middle is still hanging out in the danger zone. So for anything bigger than a single-serving fella, bake the stuffing in its own pan. Small birds served one per person, like Cornish hens and quail, heat through fast enough to be stuffed safely, but only if you follow the following rules EXACTLY:
Mix the stuffing cold, and only right before the bird goes into the oven. Never stuff a bird ahead of time, and never use stuffing you cooked earlier.
Keep it moist. Heat kills bacteria faster in a moist stuffing than a dry one.
Pack it loosely, about ¾ cup per pound of bird, in both the neck and the body cavity. Stuffing expands as it cooks, and packed-tight stuffing heats too slowly.
Close the opening with skewers and twine, or truss it shut.
Check two temperatures: the center of the stuffing and the thickest part of the bird. Both have to hit 165°F. If the meat’s done and the stuffing isn’t, the bird stays in the oven.
Let the bird rest 20 minutes, then pull out ALL the stuffing and store it separately. Leftovers go in the refrigerator within 2 hours.
Key Terms
Fabrication
Breaking a whole bird down into cuts you can cook.
Disjointing
Separating pieces where the bones meet at a joint.
Boning
Removing bones while keeping the usable meat.
Wishbone
The V-shaped bone at the neck end of the breast. Removing it makes carving easier.
Oysters (sot-l’y-laisse)
Two small nuggets of dark meat in hollows on the back, just above the thighs. Take them with the leg quarters.
Leg quarter
A thigh and drumstick still attached to each other.
Breast quarter
For this four-piece breakdown, one bone-in breast half with its wing still attached.
Keel bone
The breastbone running down the center of the breast.
Airline breast
A boneless, skin-on breast with the drumette bone attached.
Frenching
Trimming meat and skin away from the end of a bone to leave it clean and exposed.
Trussing
Tying the bird with butcher’s twine to hold its legs and wings close to the body.
Pygostyle (pope’s nose)
The fleshy tail end of the bird, between the legs, used as an anchor when trussing.
Wet brine
A saltwater solution used to season meat and help it retain moisture.
Dry brine
Salt applied directly to the bird instead of dissolved in a bucket of water.
Schmaltz
Rendered chicken fat.
Forcemeat
Seasoned, finely ground meat used for preparations such as sausage and stuffing.