
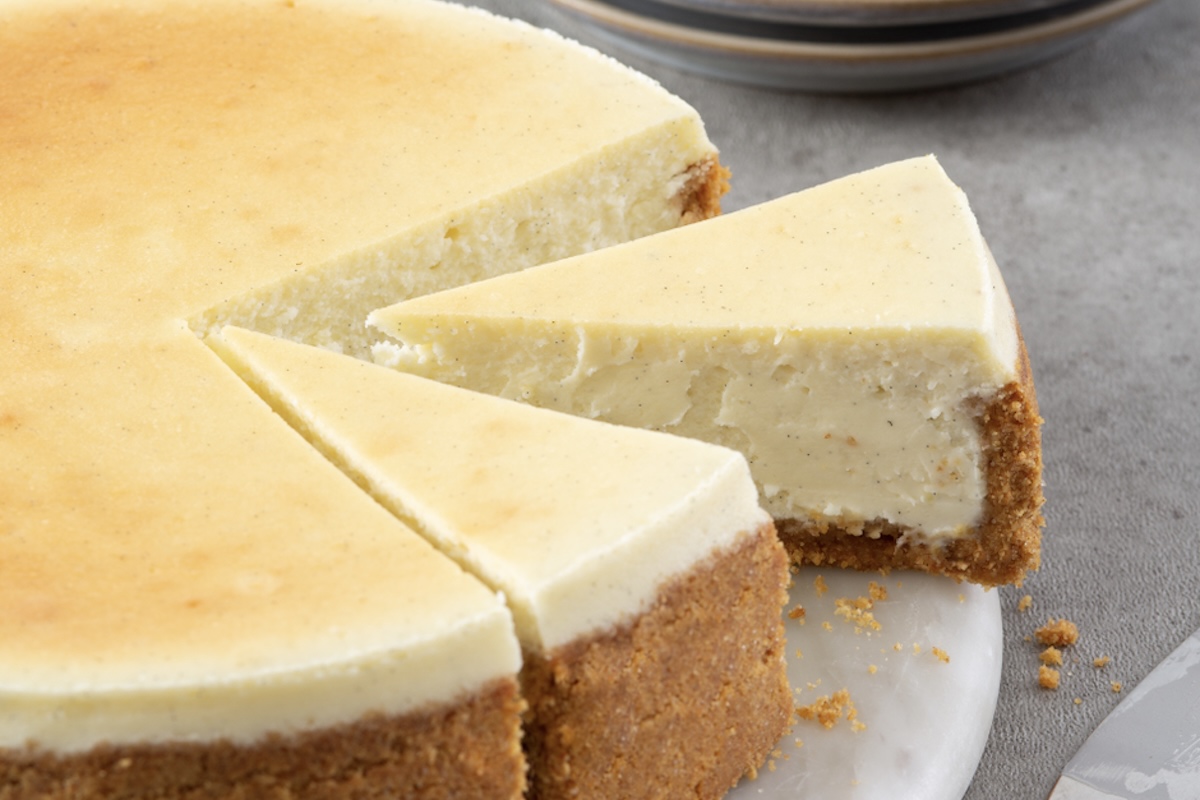
Everybody knows New York cheesecake when they see it: tall, rich, pale, deeply creamy, and substantial enough that one slice feels like a commitment. Ask exactly what makes it “New York,” though, and the clean definition starts falling apart. There is no protected formula, no single agreed-upon crust, and no historical recipe everyone can point to and call the original.
That is actually useful, because it means we can stop chasing some mythical “correct” cheesecake and pay attention to the stuff that matters. New York cheesecake is a style built through choices: cream cheese in the lead, enough structure to stand up cleanly on the plate, a smooth interior instead of an airy one, restrained browning, and a bake controlled well enough that the outside does not get wrecked waiting for the center to catch up. It’s iconic, straightforward goodness, and only tricky to make if you don’t know what you’re doing. So let’s figure it out.
- How New York cheesecake developed into a recognizable style rather than one fixed recipe.
- What makes New York cheesecake dense and creamy instead of heavy, dry, or fluffy.
- How egg coagulation, aeration, thermal gradient, and syneresis affect cheesecake texture and structure.
- How mixing technique, a water bath, temperature, movement, and cooling controls how a cheesecake sets.
HISTORY
HOW CHEESECAKE STARTED A WAR
About 100 years ago, the New York restaurateur Arnold Reuben laid claim to New York cheesecake. Around the same time, Leo Lindemann, owner of Lindy’s, poached Reuben’s pastry chef and had him recreate the popular dessert at his restaurant. Nothing about this conflict was a friendly competition: Reuben accused Lindemann of stealing his recipe, Lindemann more or less ignored him and went on selling it. Lindy’s became famous. Reuben was sad, more-or-less forgotten, and the entire time, cheesecake’s story kept getting weirder.

While Lindy and Reuben were fighting it out, New York restaurants, delis, and bakeries were making cheesecake too, and everybody kept tinkering with the details. Change the cheese. Change the crust. Make it richer. Make it taller. Add something. Take something out. New York had cooks bringing different cheesecake traditions with them from all over the culinary world, and now they had American cream cheese to play with too. New York cheesecake stopped being a single thing. It evolved into a recognizable style, not a recognizable recipe.
THE CHEESECAKE FACTORY EFFECT
For a huge number of Americans, The Cheesecake Factory is cheesecake. Tall slices, cream-cheese-heavy filling, graham-style crusts, and enough flavors and toppings to make choosing one require a committee meeting. Whatever cheesecake looked like in somebody’s grandmother’s New York kitchen, this is the version millions of modern diners learned to recognize.
And here’s a little bubble worth bursting: the restaurants don’t bake those cheesecakes in the restaurant kitchen. The company operates two large bakery production facilities—one in California and one in North Carolina—that produce roughly 60 varieties of cheesecakes and other desserts for its restaurants.
That doesn’t make their cheesecake somehow fake. It means something else entirely: Cheesecake Factory’s chain became so influential that it defined what an entire country expects cheesecake to be.

THEN JUNIOR’S SHOWED UP

A handful of decades after Reuben and Lindemann launched Cheesecake WWI, Harry Rosen opened Junior’s in Brooklyn. Rosen and baker Eigel Peterson set out to make a new cheesecake, one they hoped would become a classic. They worked through recipes and tastings until they landed on the cheesecake that became Junior’s signature dessert. Seventy-five years later, you can buy that cheesecake in the frozen-food aisle of your local grocery store. Junior’s has become the go-to cheesecake, the standard by which a whole lot of people measure every other version.
SAVE THE CHEESECAKE!
In 1981, Junior’s cheesecake was so important to the good people of Brooklyn that when a fire broke out at the restaurant, people gathered on the sidewalk chanting “Save the cheesecake!” Not the building. Not the tables. The cheesecake. At that point, I think you’re allowed to call yourself a New York institution.
SO WHAT ACTUALLY MAKES IT NEW YORK?
After all that fighting, we still don’t have one sacred recipe. We don’t have one required crust. We don’t even have one cheese that every old New York version used. What we do have is a recognizable style.
The New York cheesecake I want you to make is tall, rich, cream-cheese-forward, smooth instead of fluffy, dense without being dry, and firm enough to stand up in a serious slice. The top stays relatively pale. The inside stays creamy. Getting all of those things into the same cheesecake is where this stops being a history problem and starts becoming a cooking problem.

SO WHERE DID THE GRAHAM CRACKER CRUST COME FROM?
After all this, you might be wondering how graham cracker crusts got associated with cheesecake. I wondered the same thing. Turns out that about 100 years ago, Monroe Boston Strause, better known as the Pie King, got a good bit of advice from his mom: Why don’t you try using crushed graham crackers as a pie crust? He did. Other bakers picked up the idea, cheesecake tinkerers did too, and it spread.
Which brings us to the graham cracker crust we’re actually going to make.
BUILD A CRUST THAT STAYS TOGETHER
A graham cracker crust looks almost too easy: crumbs, butter, sugar, done. But there is still a little technique hiding in there. The crumbs need to be fine and consistent, because big chunks leave gaps and weak spots. The butter has to coat those crumbs thoroughly, and there needs to be enough of it to bind everything together once the crust is packed and baked.
Before it ever goes into the pan, grab a handful and squeeze it. It should hold together. If it immediately falls back into dry sand, putting it in a springform pan and hoping for the best isn’t going to improve the situation.
Then pack it firmly and evenly. You want pressure, not violence. A flat-bottomed measuring cup works beautifully for this because it compresses the crumbs without digging trenches through them. Pay particular attention to the edge where the bottom meets the side of the pan; loose crumbs hiding there become the first piece of crust to fall apart when you slice the cheesecake.
Prebaking sets the crust before several pounds of wet filling land on top of it. You’re not trying to turn it into a graham cracker paving stone. You’re giving the butter, sugar, and crumbs enough heat to become one crust instead of three ingredients occupying the same pan.
AND WHILE WE’RE TALKING ABOUT GRAHAM CRACKERS…
And while we’re talking about crust, I think we should pause for a brief second and talk about graham crackers. We got these delicious, cinnamon-sweet sheets of goodness thanks to the ideas of Sylvester Graham, a nineteenth-century Presbyterian minister. Sylvester really believed pretty much everything interesting was bad for you and probably sinful. Alcohol, tobacco, rich foods, highly refined flour, sexual excesses—Sylvester had concerns.
Which makes what we’re about to do with his whole-grain health food—crush it up with sugar and butter and bury it underneath several pounds of cream cheese—feel just a little bit wrong and vaguely satisfying.
I suspect Sylvester would have had deep, deep concerns.

MAKE AND BAKE
THE FILLING IS DOING ITS OWN BALANCING ACT
Cream cheese supplies the mass, richness, tang, and body that define the style. Eggs provide the structure that turns all of that dairy into a sliceable custard. Sugar does more than sweeten; it affects how that custard sets. Sour cream or heavy cream shift the richness, moisture, and acidity, while starch provides some additional structural insurance.
The goal is enough structure to hold the cheesecake together without losing the creaminess that made us want cheesecake in the first place.
And pay attention to this: When I say we want to make a dense cheesecake, that doesn’t mean heavy or dry. We’re deliberately keeping air out, but we’re also trying to stop the eggs before they squeeze the creaminess out of the cheesecake. New York cheesecake should be substantial and creamy.
LUMPS ARE YOUR ENEMY
If you want a smooth cheesecake, start with cream cheese that is actually soft enough to mix. Cold cream cheese is stubborn. It leaves lumps, those lumps make you panic, and then you keep running the mixer trying to beat them out until you have solved one problem by creating another.
Use the paddle, not the whisk, and get the cream cheese and sugar completely smooth before the eggs go in. Then scrape the bowl like you mean it: sides, bottom, paddle. A batter can look beautiful from the top while a lump of cold cream cheese is hiding underneath it waiting to ruin your day.

Once the eggs go in, slow down. Add them gradually, mix only until they disappear into the batter, and then leave the damn thing alone. More mixing at that point is not making the cheesecake smoother. It’s just adding tiny air bubbles to the batter that are going to make your cheesecake cry when you put it in the oven (and make you cry when you pull it out).
And don’t get the cream cheese beautifully soft just to dump refrigerator-cold eggs and dairy into it. Let the refrigerated ingredients lose their chill too.
PUT YOUR CHEESECAKE IN THE HOT TUB
Refresh your memory on how thermal gradient affects cheesecake: the outside gets hot before the middle does. That’s an especially big problem with a tall cheesecake. The center has a long way to go, and while we’re waiting for it, the outside keeps cooking.
The water bath – also known as the bain-marie – slows that race down. Instead of the sides of the pan sitting in a screaming-hot dry oven, they’re surrounded by hot water that heats much more gently. The outside slows down and the middle gets time to catch up. Push the outside too far and the custard gets firm, then dry and grainy, and eventually you can get syneresis. The water bath doesn’t make any of that impossible. It gives us a much bigger target to hit.
There’s a little physics helping us out here too. Liquid water can’t get hotter than 212°F before it starts turning to steam. The oven air may be much hotter than that, but the water surrounding the pan creates a protective blanket, a gentle thermal buffer around the cheesecake. It also holds a lot of heat, which helps smooth out temperature swings when you open or close the oven door. That steady, gentle environment is exactly what this kind of custard wants.
Cool, huh?
BUILD THE BATH WITHOUT FLOODING THE CAKE
Springform pans are great because they come apart, which is really helpful to get the cheesecake out . These pans are slightly less charming when you’re going to let them go wading in the shallow end of the pool. Before you do anything else, wrap the outside of the pan with a large, intact sheet of heavy-duty foil, bring it high up the sides. Then do the same thing again and give it a second layer. Keep every seam above the eventual water line and check carefully for tears.
Here’s how you do it:
- Find a roasting pan wider than your cheesecake pan. You need enough room for water to surround the springform without crowding it.
- Set the wrapped cheesecake inside the empty roasting pan. If you want a little extra stability underneath, lay a folded kitchen towel in the bottom of the roasting pan first, then set the cheesecake on top.
- Put the whole assembly onto the center oven rack before you add the water. Moving a roasting pan full of hot water and several pounds of cheesecake across the kitchen is… well, it’s stupid. Don’t do that.
- Pour very hot water carefully into the roasting pan until it reaches about halfway up the outside of the springform. Pour around the cheesecake, not directly at the foil seams, and take your time.
- Gently slide the rack back into the oven and leave it alone. The goal is a hot tub, not a swimming lesson. Be careful! Sloshing water into the cheesecake would be a disaster.
KNOW WHEN TO STOP
One of the easiest ways to ruin cheesecake is to keep baking because the middle still moves. Cheesecake is custard; it’s SUPPOSED to still show some movement in the center. The important part is how it moves. A properly set center jiggles together as one soft mass; an undercooked center ripples or sloshes like there’s liquid underneath the surface. If you bake it past the point of soft movement, congratulations, you just baked a giant, expensive Hockey Puck.
Take the temperature. We’re looking for 150–155°F in the center. Don’t stab the thing six times hunting for a number you like. Take a careful reading, look at the edges, watch the center move, and use all three pieces of information.
The time on the recipe only tells you when to start paying attention; it doesn’t tell you when the cheesecake is done. The timer has never met your oven. Cook time is an indicator, not a dictator. And here’s a fun Chef fact: this is a rule regardless of what you’re cooking. Cook times are rarely biblical.

COOL IT LIKE YOU MEAN IT
Lots of online baking sites recommend cooling a cheesecake slowly in a turned-off oven with the door cracked. That’s fine at home, I guess. It doesn’t really work in a commercial kitchen. In the bakery, cheesecakes are cooling on a worktable or speed rack.
That makes the next part pretty simple: leave it in the water bath until the water isn’t hot. Remove the foil, and move it somewhere with good air circulation. Never cover a hot cheesecake and trap all that steam against it, and don’t rush a hot cheesecake straight into the refrigerator. Let it cool for a couple hours at room temperature, then cover it and refrigerate it for at least 6 hours. Overnight is better.
And don’t cut into it warm because you’re impatient. That would be stupid. The filling is still soft, the fat hasn’t completely firmed back up, and nobody wants to eat hot, sweet cream cheese soup. We’re not making a today cheesecake. We’re making a tomorrow cheesecake.
TIPS, TRICKS, AND TROUBLESHOOTING
MY BATTER IS LUMPY.
If you catch lumps early, stop and scrape the bowl, bottom, and paddle thoroughly before continuing. If the eggs and liquid ingredients are already incorporated, don’t attack the batter at high speed for five minutes trying to eliminate every tiny speck. You’ll trade a few lumps for a batter full of unnecessary air.
Try this: put the mixer bowl over a pot of simmering water and whisk by hand. There’s a good chance the gentle heat will soften the cheese enough to get a smooth batter. If that doesn’t work, scrape the batter through a fine-mesh sieve. It won’t eliminate every tiny lump of cream cheese, but it will go a long way toward rescuing the disaster.
MY BATTER IS FOAMY OR FULL OF BUBBLES.
You’ve incorporated too much air, usually from mixing too fast, mixing too long, or trying to beat lumps out after the eggs went in. Let the batter sit briefly so some of the larger bubbles can rise, gently tap the filled pan, and stop messing with it. Interestingly enough, passing your foamy mess through a sieve will sometimes release some of those bubbles too. Give that a shot. And pray.
THE TOP IS BROWNING TOO FAST.
Tent it loosely with foil. Don’t press the foil onto the surface and don’t wrap the pan tight; we’re just shielding the top from more direct heat while the center finishes.
THE CENTER IS STILL MOVING.
Good. Now look at how it’s moving. If it jiggles together as one soft mass and the center is around 150–155°F, you’re where we want to be. If it ripples or sloshes like liquid under the surface, it isn’t done yet. Movement by itself does not mean raw.
NO, SERIOUSLY. THE CENTER IS LIQUID.
Then it needs more heat. If you’ve caught it while it’s still baking, keep cooking and check again. The refrigerator will firm the fat; it will not finish cooking the eggs for you.
Recipe
Junior’s-Style New York Cheesecake
Equipment
- Springform Pan, 8 inches
- Foil
- water bath
Ingredients
Graham Cracker Crust
- 170 g graham cracker crumbs
- 85 g unsalted butter melted
- 50 g granulated sugar
Cheesecake Filling
- 680 g full-fat block cream cheese softened
- 264 g granulated sugar
- 24 g cornstarch
- 15 g vanilla extract
- 112 g extra-large whole eggs about 2 eggs
- 151 g heavy cream
Instructions
Prepare the Pan and Crust
- Preheat the convection oven to 325°F.
- Lightly coat the inside of an 8-inch springform pan with pan spray.
- Combine the graham cracker crumbs, melted butter, and sugar until evenly moistened. Grab a small handful. If they clump together, you're good to go, if they instantly fall back to powder, add an extra tablespoon of melted butter.
- Press the mixture evenly across the bottom of the springform pan and slightly up the sides.
- Bake for 10 minutes.
- Transfer the pan to a rack and cool completely.
- Wrap the outside of the springform pan securely with heavy-duty aluminum foil, keeping all seams above the expected water line.
Make the Filling
- Fit the mixer with the paddle attachment.
- Combine one-third of the cream cheese with approximately one-third of the sugar and all of the cornstarch.
- Mix on low speed until smooth, scraping the paddle, sides, and bottom of the bowl thoroughly.
- Add the remaining cream cheese in portions, mixing on low and scraping between additions.
- Add the remaining sugar and vanilla. Mix until smooth.
- Add the eggs gradually, mixing only until incorporated.
- Add the heavy cream and mix only until the batter is completely homogeneous.
- Pass the batter through a fine-mesh sieve.
- Pour the filling over the cooled crust and level the surface.
Bake
- Set the oven to 325°F on Gentle Bake.
- Place the cheesecake inside an empty roasting pan.
- Place the roasting pan on the center oven rack.
- Add hot water to the roasting pan until it reaches approximately halfway up the outside of the springform pan.
- Bake for 60 minutes before beginning doneness checks.
- Continue baking until the outside is set and the center 2–3 inches move together as one soft mass when the pan is gently nudged.
- Verify a center temperature of approximately 150–155°F.
- Remove the cheesecake from the water bath and transfer it to a cooling rack.
Cool and Chill
- Cool undisturbed at room temperature for 2 hours.
- Cover loosely.
- Refrigerate for at least 6 hours, preferably overnight.
- Release the springform only after the cheesecake is thoroughly chilled.
Portion
- Warm a long straight-edge knife in hot water.
- Dry the blade completely.
- Cut one slice.
- Clean, warm, and dry the blade between every cut.
CHEESECAKE: AUTOPSY
More often than I would like to admit, I’ve discovered a mistake after the cooking is done. With cheesecake, these aren’t rescues; they’re autopsies. I want to know: why, dear God, why did you do this to me? Hopefully it still tastes good, and at least by learning what happened, I can avoid doing it again. I want you to do the same thing with your disaster.
MY CRUST IS WET, BUT THE CHEESECAKE IS FINE.
Water got through the foil. Springform pans aren’t watertight, and somewhere between wrapping the pan, filling the water bath, baking, and removing it, water found a way in. If the cheesecake itself is smooth, creamy, and properly cooked, don’t invent a custard problem that isn’t there.
Next time, inspect the foil before the pan goes into the bath, use large sheets without seams below the waterline, and be careful moving the pan around once it’s sitting in water.
MY CRUST IS WET AND MY CHEESECAKE IS DRY AND GRAINY.
You cooked your eggs to death.
As the egg proteins overcoagulate, their network gets tighter and tighter. Eventually they start squeezing out water—a process called syneresis. The cheesecake gets dry and grainy while that expelled moisture has to go somewhere. Some of it can migrate downward and soak into the crust.
So yes, you have a wet crust—but the water came from inside the cheesecake. The soggy crust and dry filling aren’t two separate disasters. They’re evidence of the same one.
You can’t undo overcoagulated egg proteins. Next time, start checking sooner and use temperature, movement, and appearance together instead of waiting for the whole cheesecake to become a sad, expensive hockey puck.
MY CHEESECAKE CRACKED.
Way too many well-meaning people claim they can tell you exactly why a cheesecake cracked. They’re a little overconfident. Here’s the reality: a crack is a symptom, not a diagnosis.
Overbaking can do it. Too much air can make the cheesecake puff farther and then fall harder. A cheesecake stuck to the side of the pan can tear as it contracts. Too much dry heat can contribute, and cooling too fast doesn’t help.
Look at what else happened. Did it puff dramatically? Is it dry? Did it get too brown? Was it stuck to the pan? When did the crack appear? Those clues are much more useful than deciding that cheesecakes just crack sometimes.
MY CHEESECAKE SANK.
A little settling is normal. A dramatic collapse is not. If the cheesecake puffed way up in the oven and then fell, you probably beat too much air into the batter. If the outside is set but the center collapsed into an unset mess, you probably didn’t give the center enough heat. Look at the interior before deciding what happened; the mud puddle in the middle of your cheesecake is evidence, not the diagnosis.
CLOSING SIDE WORK
TL;DR — THE LEAST YOU NEED TO KNOW
- 150–155°F — target center temperature for doneness.
- Jiggle, not slosh — the center should move together as one soft mass.
- Paddle, not whisk — smooth the cream cheese before the eggs go in; minimize aeration afterward.
- Water bath — moderates heat around the outside and reduces the thermal gradient.
- Syneresis — overcoagulated egg proteins tighten and squeeze out water.
- Cook time is an indicator, not a dictator.
The outside of a cheesecake heats and sets before the center. A water bath moderates the heat reaching the outside, reducing that thermal gradient and giving the center more time to catch up before the edges overcook.
Mixing matters too. Cream cheese needs to be smooth before the eggs go in. Once they do, excess mixing incorporates air. That air expands in the oven, which can give you a cheesecake that puffs dramatically and then collapses as it cools.
Wet crust + creamy cheesecake points toward water getting through the foil. Wet crust + dry, grainy cheesecake points toward overcoagulation and syneresis.
Read the cheesecake instead of blindly following the timer. Look at the surface and edges, watch how the center moves, and take its temperature. Appearance + movement + temperature tell you when it’s done.
Control the things that create problems before they happen: soften the cream cheese, scrape thoroughly, minimize mixing after the eggs go in, build the water bath carefully, and give the finished cheesecake enough time to cool and chill completely.
When something goes wrong, diagnose the evidence instead of naming the symptom. A crack, a wet crust, a grainy filling, or a sunken center tells you where to start looking—not automatically what went wrong.
TERMS TO KNOW
German-born American restaurateur associated with Reuben’s Restaurant and Delicatessen in New York City and with the early story of New York cheesecake.
New York restaurateur and owner of Lindy’s, another restaurant closely associated with the early development of New York cheesecake.
Founder of Junior’s, which opened in Brooklyn in 1950 and became one of New York’s major cheesecake institutions.
American baker and pastry innovator known as the “Pie King,” associated with the early use and popularization of graham-cracker crumb crusts.
A rich, cream-cheese-forward cheesecake style that is smooth and substantial rather than light and airy.
The temperature difference between the hotter outside of a food and its cooler center as heat moves inward.
Hot water surrounding a baking pan to moderate the heat reaching the outside of the food and reduce the thermal gradient.
The process in which egg proteins unfold and bond as they heat, creating the structure that sets a custard.
What happens when egg proteins tighten beyond the point needed to set the custard, producing a firmer, drier, grainier texture.
The release of water when overcoagulated egg proteins tighten and squeeze moisture out of a custard.
The incorporation of air into a mixture through mixing or beating.
Cooking that continues after food leaves the heat source because stored heat keeps moving through the food.
A baking pan with removable sides held together by a latch.