
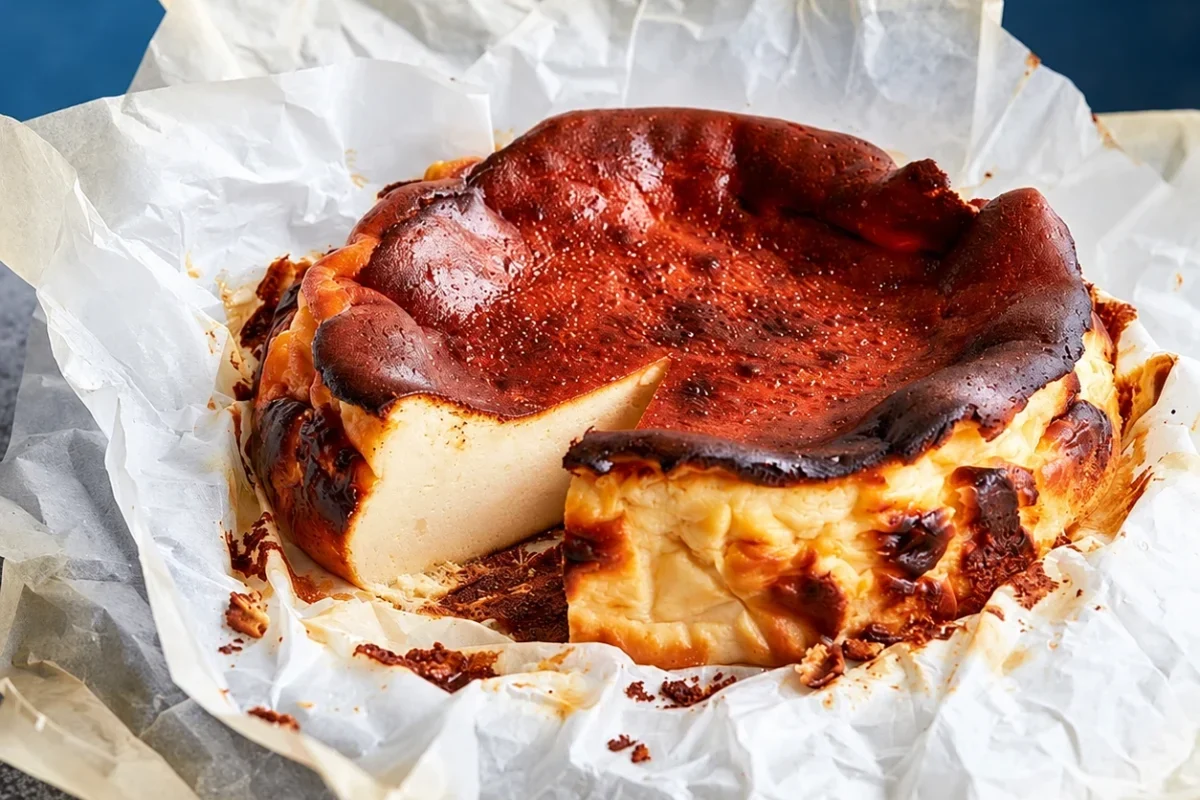
Today you can find Basque cheesecake in Michelin-recognized restaurants, luxury hotels, and pastry cases from Tokyo to New York. Chefs have dressed it up with chocolate and citrus-poached cherries, ube and huckleberry, blue cheese and honey, matcha, coffee, and whatever else they think might survive the experiment. It looks like the kind of dessert somebody invented after years in a famous pastry kitchen.
It wasn’t.
Basque cheesecake came out of a family bar in San Sebastián, made by a young man who had trained to be an electrician, couldn’t find work, went back to his father’s business, and taught himself how to cook. The cake’s biography is almost as strange as the cake itself.

Ube and Huckleberry Basque Cake
Chef Genie Kwon

Tarta de Queso Cremoso Al Horno
Chef Mikel Alonso

Chocolate Basque Cheesecake with Citrus-Poached Cherries
Executive Pastry Chef Natalie Saben
- Who Santiago Rivera was, how La Viña’s cheesecake developed, and why San Sebastián matters to the story
- What makes Basque cheesecake structurally different from other cheesecakes—the style that seems to break every rule
- How to make it: from batter and parchment to high heat, browning, doneness, cooling, and troubleshooting
THE MAN, THE CITY, AND THE CHEESECAKE
THE ELECTRICIAN WHO CAME HOME

Santiago Rivera did not grow up dreaming of making a famous cheesecake. He trained as an electrician and expected that to be his future. While still quite young, he finished his training and tried to find work, build a new life, and get on with being his own man.
It didn’t work.
So Rivera did what young men have been doing forever when Plan A collapses: he went to work for his dad at La Viña, the bar his family had been running since 1959. It is not a stretch to imagine it was a painful and humbling time for him, but here’s what makes the story interesting: Rivera didn’t do what I would have done in his place—immediately start making plans to leave, save up some money or whatever, and get back to doing my thing. He started learning.
He read cookbooks, watched chefs on television, took short courses, talked with cooks working around the city, and picked up technique wherever he could find it. La Viña was closed on Mondays, and his father let him use the kitchen to experiment. Rivera used that time to teach himself how to become a chef, making mousses, cakes, creams, pintxos—whatever interested him—and changing things until they worked. Most of those experiments stayed... experiments. One did not.
THE CHEESECAKE THAT STUCK
Rivera started working on cheesecake in the late 1980s and kept changing it. Different cheeses came and went. An early version used a quark-style cheese. He tried blends. He changed products when something else became available or simply worked better.
Then the crust disappeared. Why? Rivera wanted a cheesecake that melted in the mouth. A cookie base interrupted that. You had to stop and chew it. So he got rid of it. The cheesecake became softer, cleaner, almost uninterrupted from fork to palate.
His father tried it. Loved it. And essentially told him, keep making that one.

La Viña’s customers agreed, and the restaurant went from making a few cheesecakes to making them constantly. Eventually the shelves filled with them. Whole cakes left the restaurant. Slices moved across the bar all day. The odd experiment from the Monday kitchen had become the thing people came looking for.
And it happened in San Sebastián, exactly the kind of city where something like that could catch on.
SAN SEBASTIÁN LOVES CULINARY INNOVATION

San Sebastián sits on Spain’s northern coast, wrapped around the Bay of Biscay. It’s a ridiculously beautiful setting: old stone buildings circling a glistening bay, narrow streets, hills dropping toward the sea.
San Sebastián is part of the Basque Country, a culturally distinct region spanning northern Spain and southwestern France, with its own language, Euskara, its own traditions, and a fierce regional identity. Spanish and Basque are both spoken here.
One important distinction: Basque cheesecake is not an old Basque dessert, and its caramelized exterior and soft center are not some ancient regional cheesecake tradition. It is called Basque cheesecake because Rivera created it here.
The scenery and history account for—for me—only about 22.5% of what makes this place magical.
Food is woven into the identity of San Sebastián the way jazz is woven into New Orleans or barbecue into Memphis. Serious cooking is not reserved for white tablecloths and tasting menus. It lives in neighborhood bars, family restaurants, markets, bakeries, and some of the most ambitious kitchens in the world.
HOW SAN SEBASTIÁN EATS


A CITY BUILT FOR TASTING
The rhythm of eating in San Sebastián is loose and social. A couple of bites here, something different farther down the street, another stop after that. Friends eat, talk, walk, taste, and keep going.
That means tourists and residents are constantly trying food from different cooks. They compare. They remember what was worth coming back for. When somebody makes something exceptional, word does not have far to travel.
La Viña fits perfectly into this world. It was not a pastry shop or some hushed temple of fine dining. It was—and still is—a busy family bar, with coffee, wine, pintxos, conversation, and people constantly coming through the door.
PINTXOS

A pintxo is a small composed bite from the Basque Country. Think of tapas as the nearest relative, but pintxos have developed their own identity here. Some are almost absurdly simple: an anchovy, a pepper, a piece of bread. Others look like somebody shrank a restaurant plate down to three bites.
Cold pintxos are often spread across the counter—platters and platters of tiny, beautiful bites. The format gives cooks room to specialize. One place gets known for anchovies. Another for mushrooms. Another for tortilla. A restaurant doesn’t need a giant menu to build a reputation. Sometimes one thing is enough.
SERIOUS COOKING IS EVERYWHERE
Don’t let San Sebastián’s casual approach to eating fool you into thinking the competition for diners wasn’t fierce. This seaside city is crowded with serious, talented, celebrated chefs turning out world-class food.
Traditional Basque restaurants, family businesses, modern kitchens, and Michelin-starred restaurants all operate in this tiny city by the sea. Rivera was teaching himself how to cook from books, television, short courses, and anybody willing to teach him, while some of the most accomplished chefs in Europe were working only a few streets away.
That is a remarkable place for a self-taught cook to start experimenting—and an even more remarkable place to have one of those experiments discovered.
THEN THE WORLD FOUND IT
It wasn’t long before San Sebastián’s food tourists found La Viña, found Santiago Rivera’s cheesecake, and started telling their friends about it. Word spread. Travel writers wrote about it. Diners photographed it. Then social media came along and poured gasoline on the fire.
Rivera made the spread easier by sharing his recipe instead of guarding it like the long-lost map to the Golden City. Cooks took it home and started doing exactly what Rivera had done: making little changes here and there. Making adjustments. Letting it grow. Making it theirs.

Santiago Rivera’s Basque cheesecake arrived in London, New York, Tokyo, Sydney, Paris, Istanbul, and far beyond Spain. In Turkey, it became a phenomenon under the name San Sebastian cheesecake. Then came chocolate versions, matcha versions, coffee versions, fruit versions, different cheeses, different textures, different degrees of browning.
At some point, the cheesecake stopped belonging only to La Viña. It became a style.
And the whole thing started with a failed electrician who went back to a family business he did not want, taught himself a new trade, got permission from his father to screw around in the kitchen, and created a worldwide phenomenon.
Next up: we’re going to retrace Rivera’s path from ingredients to finished cake—the crust he threw away, the parchment, the aggressive heat, the dark top, the soft center—and figure out for ourselves why every one of those choices works. Then we’ll make it ourselves.
BREAK EVERY RULE
San Sebastián’s Basque cheesecake looks a bit like a kitchen catastrophe: no crust, no water bath, high heat, dark top, soft, soft center, wrinkled sides, and a cake that rises and collapses like a Florida sinkhole. In a New York-style cheesecake, any of those things would be ruinous disasters. Here, they define the style. When learning how to make Rivera’s invention, the question becomes not just HOW to do it, but WHY does it work?
BATTER — SAME RULES
The batter rules for making a Basque cheesecake transfer from the New York style: start with room-temperature cream cheese, get it smooth, scrape the bowl, and do not whip a bunch of air into it. Excess aeration is bad. Don’t do it.
USE THE THERMAL GRADIENT BACKWARDS
Every cheesecake develops a thermal gradient: the outside gets hotter before the center does. In New York cheesecake, we spend most of our effort learning to control that difference: use a water bath, lower the heat, bake it slow. Everything we do works toward the same goal: keep the outside from racing too far ahead of the middle.
Basque cheesecake turns all those rules on their head. Use high, dry heat to create a steep difference between the outside and the center. The exterior heats fast, firms up, dries, and browns while the center lags behind and stays soft and custardy. Here, even cooking isn’t the goal. We want the outside and center to end up in different places. New York restrains the thermal gradient. Basque exploits it.
WHY IT GETS SO DARK
New York and Basque cheesecakes both start as simple custards, but they chase very different flavors. Think of New York cheesecake like vanilla pudding. The goal is clean dairy flavor, tang, vanilla, and smooth custard. Heavy browning would pull that flavor toward toasted, roasted, nutty, and bitter notes nobody wants in their peel-off plastic cup, so we make sure they don’t happen. Basque cheesecake is more like crème brûlée: smooth, creamy center, heavily browned surface.
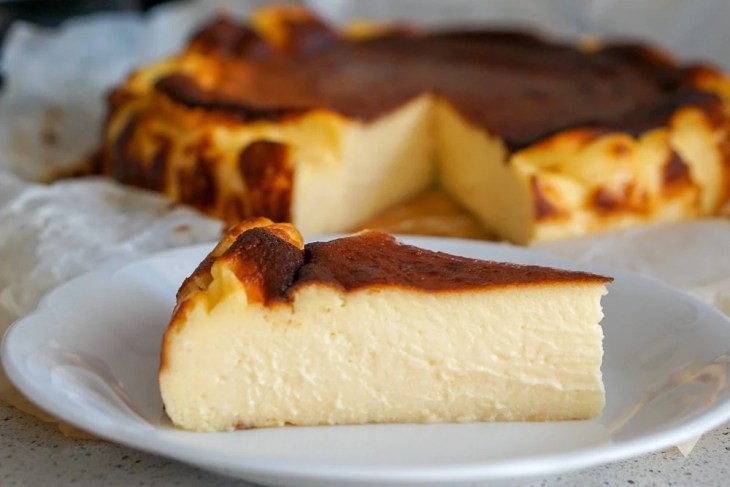
Here’s how it happens: moisture evaporates from the surface of the cake, allowing that surface to dry and get much hotter than the wet center. That creates the conditions for the Maillard reaction, where proteins and sugars react to produce roasted, toasted, nutty, and deeply savory-sweet flavors. Sugar concentrated at the hot surface also contributes caramelized and bittersweet notes.
The wet center stays cooler, so it does not brown the same way. That is how one slice can have a dark, intensely flavored exterior and a soft custardy center at the same time.
BROWN IS GOOD. BURNT IS NOT.
The phrase Basque burnt cheesecake can send cooks in the wrong direction. You see it all over the internet and social media: “Just tried the most delicious burnt cheesecake, guys! You gotta try it!” These are well-intentioned morons.
We want deep brown, mahogany, roasted flavor, and a touch of bitterness. We do not want black, acrid, ashy, or carbonized. Burnt is still burnt.
CHOCOLATE CHANGES THE SYSTEM
Our version adds chocolate and espresso, and that changes the process of making the cheesecake quite a bit. For the chocolate, we are using cocoa mass—sometimes called chocolate liquor—which you can absolutely buy premade. They sell it in big blocks. But why buy it when we can make it ourselves? What would be the fun in that?
TOOLS & INGREDIENTS: WHAT WE’RE USING

A cocoa nib is the roasted interior of the cacao bean after the papery outer shell has been cracked away. That is the part we want: intensely flavored cacao solids packed with natural cocoa butter.
Before the nibs go into the melanger, pick through them carefully. Winnowing removes most of the shell, but not all of it. Small, hard fragments of dried husk can remain mixed in with the nibs. They look like little stones and cooks tend to call them that, but most of what you are finding is shell. Get them out before they go into the grinder.
If one gets caught under the granite wheels, it will jam the melanger and bring the whole thing to a stop. Then you get the dirty task of digging through a black-tar goo of half-ground nibs with your fingers, fishing around for one tiny piece of husk while saying inappropriate bad words. Find the stones before you dump the nibs into the grinder and skip the mess entirely.
The other ingredient is cocoa butter, the natural fat from the cacao bean. The nibs already contain a lot of cocoa butter. We add a little more because all those tiny cocoa particles need enough fat around them to move freely. More cocoa butter loosens the mass and makes it easier to grind and eventually mix into the cheesecake.
Our main tool is a melanger, a stone-grinding machine with heavy granite rollers that continuously crush and refine the nibs.
For our version, we use the melanger to turn roasted cocoa nibs into cocoa paste. At first, the nibs look dry and solid. That can be misleading because cacao naturally contains a large amount of cocoa butter. As the heavy stones grind the nibs, two important things happen at the same time: the nibs are crushed into smaller and smaller particles, and the cocoa butter trapped inside them is released. Friction from the grinding warms the mixture, which keeps that cocoa butter melted.
dry nibs → coarse rubble → thick paste → smooth cocoa mass
That is why the mixture changes so dramatically: dry nibs → coarse rubble → thick paste → smooth cocoa mass. Nothing magical was added to make it “liquid.” Grinding simply released the fat and spread it around the increasingly tiny cocoa particles.
The longer the melanger runs, the less gritty the cocoa mass becomes. We add a small amount of cocoa butter to help it move more freely, but the goal is straightforward: cocoa mass smooth enough to disappear into the cheesecake batter instead of leaving grit behind. In technical terms, we are aiming for particles around 20 microns—small enough that your tongue no longer reads them as grit. In practical kitchen terms: really, really smooth.
That is why the clock is only a guide. Twenty-four to forty-eight hours may get us where we need to be for cheesecake, but we stop when the cocoa mass has reached the texture we need, not because a timer says we are done.
WHY NOT JUST USE A CHOCOLATE BAR?
You can. But unless you are buying a very, very expensive chocolate bar, you are not getting anything close to the same flavor experience.
Freshly roasted and ground cocoa liquor has as much in common with supermarket chocolate as a steaming shot of regional espresso you’re sipping at the base of a mountain in Mexico has with instant coffee dissolved in hot tap water from a public bathroom. Both technically get you to “coffee,” but they are not remotely the same experience.
Fresh cocoa liquor gives us the flavor of the cacao itself: the roast, the bitterness, the fruit, the nuttiness, the acidity, and whatever else that particular batch brings with it. A typical grocery-store chocolate bar has been sweetened, standardized and blended, flavored, emulsified, and designed to taste reliably like that brand’s version of chocolate—then sit on a shelf at Publix for six months without going too stale.
For this cheesecake, we want the chocolate to taste like cacao, not just “chocolate-flavored sweetness.”
WHY COCOA MASS CHANGES THE CHEESECAKE
Whether we make the cocoa mass ourselves or buy it, it brings both cocoa solids and cocoa butter into the cheesecake. The cocoa solids bring the deep chocolate flavor, bitterness, and roasted notes. The cocoa butter adds more fat and firms as the cake chills, so our chocolate version will set a little denser than Rivera’s original.
Espresso is there to deepen that cacao flavor, not turn this into coffee cheesecake. You shouldn’t actually taste the coffee. It is there to accentuate, not dominate.
RISE, FALL, AND DONENESS

Basque cheesecake rises more dramatically than other styles because of the aggressive heat. Air in the batter expands, steam forms, and the custard stretches around that pressure as it cooks. Then the cake comes out of the oven and falls. Do not despair—this is totally normal.
As the cake cools, steam pressure drops, gases contract, and the still-soft center settles. A properly baked cake should have a deeply browned exterior, clearly set outer structure, and a center that still moves. It should not be rigid all the way through, but it also should not slosh like raw scrambled eggs in a gallon Glad bag.
Here’s the difference: in both cheesecakes, raw is still raw and dry is still overbaked. What changes is the target. New York wants an even, restrained bake, with doneness pretty consistent from edge to center. Basque wants a much stronger contrast between the outside and the middle.
One major difference: we are not temping this style for doneness the way we did with other varieties, shooting for 150–155°F in the dead center of the cake. For Basque, we follow the visual and movement cues: dark exterior, set outside, soft moving center.
TIPS, TRICKS & TROUBLESHOOTING
Get the pan ready first. Crumple the parchment, flatten it back out, and press it into the pan with plenty extending above the rim. This cake rises hard. Pretty parchment is not the goal.
Start with truly room-temperature cream cheese. Cold cream cheese means lumps. Scrape the sides, bottom, and paddle more than once; a smooth-looking surface can still hide unmixed cheese underneath.
Once the eggs go in, stop beating the hell out of it. Mix only until combined. Extra air makes an already dramatic cake rise even harder and gives you less control over the final texture.
Finish the cocoa mass before it touches the batter. If it still feels gritty, it is not done. And keep both the cocoa mass and batter fluid enough that the cocoa butter blends in cleanly instead of setting into flecks or streaks.
Preheat the oven completely. Basque cheesecake depends on aggressive heat from the start. Do not put the cake into an oven that is still climbing toward temperature.
Leave the oven door shut until you actually need to judge the cake. Watch through the glass. Rising, wrinkling, darkening, and looking slightly alarming are all part of the process.
Read color and movement together. Deep mahogany is the target. The outside should be set while the center still moves as one soft mass. Pale is underdeveloped; black and acrid is burnt; liquid sloshing in the middle is still raw.

Recipe
Chocolate-Espresso Basque Cheesecake
Equipment
- 8-inch round cake pan with tall parchment liner
- Pan spray, as needed
Ingredients
Cheesecake Base
- 450 g full-fat block cream cheese softened
- 130 g granulated sugar
- 3 g fine salt
- 10 g high-fat cocoa powder
Chocolate-Espresso Ganache
- 70 g 64% dark couverture chocolate
- 100 g house-made cocoa mass
- 240 g heavy cream
- 10 g vanilla bean paste
- 8 g instant espresso powder
Eggs
- 150 g whole egg
- 40 g egg yolk
Instructions
Prepare the Pan
- Preheat the convection oven to 375°F.
- Lightly coat an 8-inch round cake pan with pan spray.
- Crumple and reopen the parchment.
- Line the pan completely, allowing the parchment to extend at least 2 inches above the rim.
- Press the parchment firmly into the bottom and sides of the pan.
Make the Cheesecake Base
- Fit the mixer with the paddle attachment.
- Combine the cream cheese, sugar, salt, and cocoa powder.
- Mix on low speed until completely smooth, scraping the paddle, sides, and bottom of the bowl thoroughly.
Make the Chocolate-Espresso Ganache
- Combine the couverture chocolate and cocoa mass in a heatproof container.
- Heat the heavy cream, vanilla bean paste, and espresso powder until steaming.
- Pour the hot cream mixture over the chocolate and cocoa mass.
- Allow to stand briefly.
- Emulsify with an immersion blender until completely smooth and glossy.
Finish the Batter
- Add the whole eggs and yolks gradually to the cream-cheese mixture, mixing on low speed only until incorporated.
- Add the chocolate-espresso ganache.
- Mix on low only until homogeneous.
- Scrape the bowl thoroughly.
- Pass the batter through a fine-mesh sieve.
- Pour into the prepared pan and level the surface.
Bake
- Bake at 375°F in standard convection.
- Begin checking at 40 minutes.
- Continue baking until the outer portion is fully set, the surface is dry rather than wet and glossy, and darker roasted areas and cracking have developed around the exterior.
- Gently move the pan. A broad section of the center should still wobble like thick custard; it should not slosh like liquid.
- Remove from the oven when the exterior is fully developed and the center retains the intended soft set.
Cool and Chill
- Cool in the pan on a rack at room temperature until no longer warm.
- Refrigerate overnight.
- Remove from the pan only after the cheesecake is thoroughly chilled.
- Peel the parchment away gently.
Portion and Serve
- Cut with a clean, warmed straight-edge knife.
- Clean and dry the blade between slices.
- Allow portions to lose some refrigerator chill before service for a softer, creamier center.
Notes
CLOSING SIDE WORK
CHEESECAKE: AUTOPSY
| What you found | What it tells you |
|---|---|
| Top stayed pale even though the center was ready | The problem was surface heat, not bake time. Check the actual oven temperature, preheat, rack position, and the parchment collar. If the parchment stands too high above the cake, it can shield the surface from the heat that should be browning it. |
| Top went black while the center was still far behind | The surface was taking heat faster than the center could set. The cake may have been too close to the upper heat source, the oven may be running hotter than expected, or convection may be driving browning faster than the interior can keep up. |
| Huge soufflé-like rise followed by a deep crater, tunnels, or a spongy interior | Too much air went into the batter. Those bubbles expanded dramatically in the oven and the custard began setting around them. As the cake cooled, the gases contracted and the structure fell back down. The collapse itself was not the problem; the oversized bubble structure underneath it was. |
| Grainy or curdled interior with watery seepage | The proteins tightened too far and squeezed moisture out of the custard. That is syneresis: the cake moved past a smooth set into overcoagulation. |
| Chocolate flecks or streaks through the custard | The cocoa butter began firming before the cocoa mass could disperse evenly. The chocolate and batter were too far apart in temperature when they were combined. |
| One side is much darker than the other | That points to the oven more than the batter: uneven airflow, a hot side, or rack position. Learn how your oven moves heat before changing the formula. |
TERMS TO KNOW
Basque
The people, culture, and region spanning parts of northern Spain and southwestern France, with its own language, Euskara, and a strong regional identity.
Basque Cheesecake
The crustless, deeply browned cheesecake style developed by Santiago Rivera at La Viña in San Sebastián.
Santiago Rivera
The self-taught cook at La Viña who developed the cheesecake that became the model for the modern Basque style.
La Viña
Rivera’s family bar in San Sebastián, where the cheesecake was developed.
San Sebastián
The Basque coastal city where Rivera created the cheesecake and where La Viña operates.
Pintxo
A small composed bite associated with Basque bar culture. Some are simple; others are miniature restaurant-style dishes.
Cocoa Nib
The roasted interior of a cacao bean after the shell has been removed.
Cocoa Mass / Chocolate Liquor
Finely ground cacao containing both cocoa solids and cocoa butter. Despite the name, it contains no alcohol.
Cocoa Butter
The natural fat in cacao.
Melanger
A stone grinder that uses heavy granite rollers to crush and refine cacao.
Maillard Reaction
Browning reactions between amino compounds and sugars that create roasted, toasted, and savory-sweet flavors.