While I typically love to write about the history of a recipe or delve into how it came to be so popular or famous or forgotten or whatever…. I’m not going to do that this time. Just the facts, kid. Only what you need to make it taste delicious and nothing else.
Desperate for some context, some history and need to read up? Scroll down. I’ve got some tidbits at the bottom of this post (but not much).
For everyone else? You’re welcome. Let’s get baking.

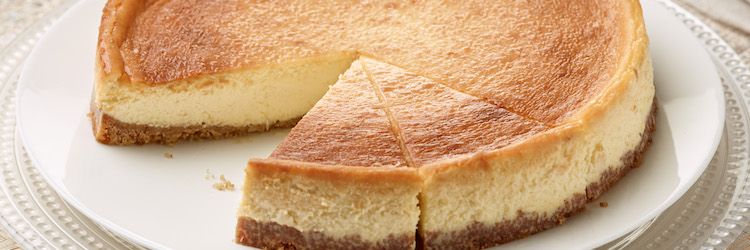
Hot, then not-so-hot, a slow coast to room temperature, then a long cool: how to bake your cheesecake
All our cheesecake recipes use the same process: the two hour bake, two hour rest, four hour cool method. That’s right. To do this correctly, you are going to devote 8 hours of your life to deliciousness. Make the sacrifice.
Here’s how you do it:
- Preheat the oven to 350*F
- HOT – Place unbaked cheesecake in the hot water bath, oh-so-carefully slide it into the oven, close the door, then immediately CHANGE the temperature to 325*F for the first 20 minutes.
- NOT-SO-HOT – Without opening the door, lower the temperature again, this time to 300*F for the next 40 minutes. NOTE: better check to see if it is done during the last 20 minutes or so of cooking. If it is showing signs of doneness early, move on to the cooling stage.
- SLOW COAST – Turn off the oven, crack the door, and allow the cheesecake to slowly cool down IN THE OVEN and IN THE HOT WATER BATH for an additional hour. Don’t skimp on this step. If the cheesecake cools too fast, the top will crack, your friends won’t eat it, you’ll end up homeless, sad, and will surely die alone.
- ROOM TEMPERATURE – Remove cheesecake from the oven, lift out of the water bath, and allow to come to room temperature for two hours on the counter or worktable.
- LONG COOL – Wrap tightly and refrigerate for four hours before service (preferably overnight) … STILL IN THE PAN. That’s right. Don’t remove it from the pan while it is cooling. The cake hasn’t yet set all the way and the sides will bulge if you take it out of the pan too soon.
The hows and the whys of the water bath

Because cheesecake batter is basically a rich custard, it needs to be treated delicately. Without the moist heat of a water bath, the custard will take on a rubbery texture.
A water bath, also known as a bain marie, is the baker’s secret to creamy cheesecake perfection. It’s also a wonderful way to bake any custard or bread pudding. With cheesecake, your primary goal is to bake it slowly and evenly without browning the top. When you bake in a water bath, the water surrounding the pan will never get hotter than 212 degrees, no matter how hot the oven is. Cool, huh?
Here’s how you do it.
- Find a pan that is wider than your cheesecake pan.
- Line the bottom with a heavy dish towel
- Place your cheesecake in the pan – right on top of the dish towel. Bring a saucepan of water to boil. Transfer the pan (with the unbaked cheesecake) to the middle rack of a preheated oven. Carefully pour boiling water into the roasting pan until it reaches about halfway up the sides of the pan, then gently slide the rack into the oven, being careful not to slosh boiling water INTO the cheesecake (’cause that would be a disaster).
- After the oven rest period, remove the cheesecake from the water bath and allow to come to room temperature on the counter.
Is it done yet?
Here’s the most common question new bakers ask: How do I know if my cheesecake is done cooking?
Most cheesecake recipe writers suggest checking for doneness with the “finger test” — the top should spring back a bit. Also popular is the “shake” test — if the edges are puffed up, the top is golden, and the center jiggles just a bit, like nearly set jello, it’s probably done.
HOWEVER… Cheesecake is done cooking when it reaches an internal temperature of 150 – 155*F as measured on an instant read thermometer. Since oven times can vary dramatically, the only SURE way of knowing your cheesecake is done baking is to test the temperature. The jiggle test and the finger test are okay… but you can still make a significant error and end up with a runny mess or an overbaked disaster.
Use a thermometer, kid. It’s safer.
Recipes

Simple Ricotta Cheesecake
Ingredients
- 16 oz cream cheese softened until room temperature
- 16 oz ricotta cheese
- 4 large eggs
- 1 ½ cups white sugar
- ½ cup unsalted butter melted and cooled
- 3 tablespoons flour
- 3 tablespoons cornstarch
- 1 tablespoon lemon juice
- 1 teaspoon vanilla extract
- 16 oz sour cream
- 1 quart fresh berries strawberries, cherries, blueberries, blackberries…. whatever is in season and tickles your fancy
Instructions
- Place ricotta in a fine-meshed sieve lined with cheesecloth over a bowl and let drain for 1 hour.
- Preheat oven to 350℉. Lay parchment inside a 9 x 4 inch pie pan in such a way it overlaps and completely covers the bottom and sides of the pan, allowing some parchment to rise above the rim (to provide a "handle" for lifting the cheesecake out of the pan after baking). Brush parchment with melted butter.
- Add softened cream cheese to bowl of a stand mixer and whip until light. Reserve.
- Add ricotta cheese, lemon juice, and lemon zest to stand mixer and beat until smooth. Add eggs, one at a time. Beat in sugar, butter, flour, cornstarch, and vanilla. Scrape bowl. With mixer on low, add cream cheese and sour cream. Pour into prepared pan.
- Bake in the preheated oven for 1 hour. Turn the oven off; allow cheesecake to cool in the oven with the door closed for 1 hour more to prevent cracking. Cool cheesecake completely in the refrigerator before serving.
- Garnish with fresh fruit
Notes

Chocolate Espresso Cheesecake
Ingredients
For the Crust
- 2 cups Chocolate graham crackers, crushed about 16 sheets
- 6 tbsp unsalted butter melted
- 1/3 cup granulated sugar
For the Chocolate Cheesecake
- 1/4 cup very strong, freshly brewed coffee
- 2 cups Hershey's Special Dark Chocolate grated
- 24 oz cream cheese room temperature, 608 g
- 1 pinch salt
- 1 cup sugar 200 g
- 1/4 cup sour cream
- 1 tbsp vanilla extract 15mL
- 4 eggs, large room temperature
- 3 tbsp All purpose flour
For the Ganache:
- 1/2 cup semisweet chocolate
- 1/2 cup heavy cream
- 1 1/2 tsp espresso powder
For the Chocolate Whipped Cream:
- 2 cups heavy cream very cold
- 1/4 cup powdered sugar
- 1 tbsp vanilla extract
- 3 tbsp cocoa powder
- 1/2 cup Heavy Cream very hot
- 1/2 cup Hersheys Special dark chocolate grated fine
- 1 tsp espresso powder
For the Garnish
- 1 quart strawberries, raspberries, or blackberries
- 8 oz melting white chocolate
Instructions
For the Crust:
- Preheat oven to 350℉. Lay parchment inside a 9 x 4 inch pie pan in such a way it overlaps and completely covers the bottom and sides of the pan, allowing some parchment to rise above the rim (to provide a "handle" for lifting the cheesecake out of the pan after baking). Brush parchment with melted butter.
- Add chocolate graham crackers to your food processor and pulse until broken into small pieces. Add sugar and pulse to combine. Pour in melted butter while pulsing processor. Remove blades and use a spatula to mix butter in completely.
- Transfer mixture to your pan and spread our with a spatula so the crumbs are evenly distributed on the bottom and toward the side as well. Press into a flat layer using a tall glass and compact the side to it keeps it's shape after cutting.
- Bake for about 10 – 15 minutes at 350℉, or until fragrant and a darker golden color. Remove from oven, set aside. Reduce oven temperature to 325℉.
For the Filling:
- Place grated chocolate in a bowl and pour the hot coffee over, stirring to blend. Allow to stand for a few minutes and then stir until glossy and smooth. Microwave on half power for 30 seconds if chunks still remain. Reserve.
- Add ROOM TEMPERATURE cream cheese to stand mixer fitted with a paddle attachment and mix at medium speed to cream for two minutes until fluffy.
- Add the sugar and salt to the bowl and mix on medium until smooth, about two minutes. Scrape bowl down and mix until completely homogenous.
- Add sour cream and vanilla extract, mix well then add the eggs one at a time, allowing each to incorporate before adding the next. Sprinkle in the flour and continue to mix. Scrape the bowl down and mix until completely smooth.
- Pour in the melted chocolate and mix on low until combined. Scrape the bowl down and mix once more.
- Pour the batter into the prepared springform pan. The batter should come up nearly to the top.
- Place springform pan into a large roasting pan, surround with about an inch of very hot water.
- Bake at 325℉ for 20 minutes. WITHOUT OPENING THE OVEN, reduce temperature to 300℉ and bake another 40 minutes or until cake's edge is set but center is still wobbly.
- Turn oven off but leave door closed. Allow cake to rest for an additional hour in the oven. DO NOT OPEN OVEN DURING THIS TIME. Remove from oven and cool to room temperature then cover with a towel or paper towel and chill for 12 hours.
For the Ganache:
- Warm the heavy cream in the microwave until quite hot (but NOT boiling – that will scald the chocolate). Pour over grated chocolate and stir, then allow to rest for two minutes to melt. Add espresso powder and stir until glossy.
- Allow to cool until barely warm, then carefully spread the ganache onto the cake. Return cheesecake to refrigerator to chill while you make the chocolate whipped cream.
For the Chocolate Whipped Cream:
- Warm the heavy cream in the microwave until quite hot (but NOT boiling – that will scald the chocolate). Pour over grated chocolate and stir, then allow to rest for two minutes to melt. Add espresso powder and stir until glossy. Allow to cool to room temperature before proceeding. Do NOT add hot ganache to cold whipped cream.
- Add the cold cream, vanilla extract, and sifted cocoa powder/ powdered sugar to the bowl of your stand mixer. Mix with a whisk attachment until semi-stiff peaks form.
- With mixer on low, add cooled ganache in a steady stream. Scrape sides of bowl and whisk for semi-stiff peaks.
- Transfer whipped cream to a piping bag fitted with a star attachment and refrigerate for mousse topping to firm up.
Construct and garnish
- No more than 30 minutes before serving, pipe mousse onto the cake's edge using small circular motions.
- Garnish with oreos and fresh berries.
- Melt white chocolate according to manufacturer's instructions. Drizzle over edges of cake, oreos, and berries in preferred design
- Refrigerate until service.

Carrot Cake Cheesecake
Ingredients
Cheesecake Mixture
- 16 oz cream cheese softened well (but not melted)
- 2/3 cup granulated sugar
- 1 1/2 tsp all-purpose flour
- 2 large eggs
- 1 tsp vanilla extract
- 1/2 cup sour cream
Carrot Cake
- 1 1/2 cups all-purpose flour
- 1/2 tsp baking soda
- 1/2 tsp baking powder
- 1/4 tsp salt
- 1 tsp ground cinnamon
- 1/8 tsp ground nutmeg
- 1/2 cup canola oil
- 1/4 cup unsweetened applesauce
- 2/3 cup granulated sugar
- 1/3 cup packed light-brown sugar
- 2 large eggs
- 1 tsp vanilla extract
- 2 cups finely grated carrots
Topping
- 2 oz cream cheese softened
- 1 Tbsp butter softened
- 1 cup powdered sugar
- 2 oz sour cream
- 1/2 tsp vanilla extract
Instructions
- Preheat oven to 350℉. Lay parchment inside a 9 x 4 inch pie pan in such a way it overlaps and completely covers the bottom and sides of the pan, allowing some parchment to rise above the rim (to provide a "handle" for lifting the cheesecake out of the pan after baking). Brush parchment with melted butter.
For the cheesecake mixture:
- In the bowl of a stand mixer fitted with a paddle attachment, add sugar, flour, and softened cream cheese, then blend on low speed until smooth.
- Mix in eggs one at a time, mixing just until combined after each addition and adding in vanilla with second egg. Blend in sour cream. Scrape bowl and mix again. Tap bowl of batter on the counter to release air bubbles. Set mixture aside.
For the Carrot Cake
- Sift flour, baking soda, baking powder, salt, cinnamon and nutmeg.
- In the bowl of a clean stand mixer, add canola oil, applesauce, granulated sugar, brown sugar, eggs and vanilla extract. Blend on low for a minute. Add in dry ingredients in three additions and mix until well blended. Fold in carrots until evenly distributed. Tap bowl against counter to release air bubbles..
To assemble cheesecake:
- Cut a circle of parchment that will completely cover the interior of the cake pan. Be sure to leave at least two of the sides "sticking up." This is how you will lift the finished cheesecake from the pan. Brush parchment with melted butter.
- Pour 1 1/2 cups carrot cake mixture into pan and spread into an even layer. Dollop about 1/3 of the cream cheese mixture by the spoonfuls over carrot cake layer (don’t spread or swirl).
- Spoon remaining carrot cake mixture over cream cheese layer, then finish by drizzling the remaining cheesecake mixture over carrot cake layer, working to cover all of the carrot cake mixture.
- Bake in preheated oven 65 – 75 minutes, until center portion only jiggles slightly.
- Fourty minutes into the bake time, tent cheesecake with aluminum foil to prevent excessive browning.
- Turn off oven and leave in cooling oven for 1 hour, then cover and chill in refrigerator overnight.
For the topping:
- Whip together cream cheese and butter until smooth. Add remaining topping ingredients and mix until pale and fluffy, about 4 – 5 minutes.
- Spread evenly over cheesecake. Garnish edges with chopped pecans, if desired.

Just a bit of history…
Cheesecake is the stereotypical bad boy of the dessert world: gorgeous without trying too hard, and addictive with an uncertain past as alluring as its taste. Typically made as a luscious cheese-based filling with a cookie crust, and sometimes swirled or topped with chocolate or berries, it’s one of the most recognizable desserts in the country. While many people believe that this decadent treat originated in New York City—and understandably so, as it is the Big Apple’s signature dessert—accounts of cakes made of cheese date back to ancient Greece.
One of the first recorded recipes, dated in the first century and called “libum,” is a far cry from the creamy cake we know today. This Greek recipe called for two pounds of “well crushed” cheese mixed with flour and a single egg, formed into a loaf and baked in a hot fire under a brick.

A similar incarnation featured honey and was served to the first Olympic athletes as a source of energy before the games. When Greece was conquered by Rome, the recipe for libum was among the spoils of war. The Romans referred to their take on cheesecake, somewhat unappetizingly, as “placenta,” which they topped with black sesame seeds and served in square slabs. These ancient cakes were considered delicacies and, as such, were often given as tribute to the gods and served by brides to grooms at weddings as a token of love.

As Roman influence spread, so did the prevalence of recipes referring to cakes made of cheese. Through the centuries, cheesecake has surfaced in many forms. Some savory versions featured yeast rather than eggs, while some sweet varieties literally dripped in honey. The cheesecake we know today began to take shape after the development of creamy Neufchâtel cheese in France. Colonists brought cheesecake to the New World, and in 1872, a New York dairy farmer’s attempt to recreate this soft French cheese went awry, resulting in the creation of what Americans know as cream cheese—and the cheesecake game was changed forever.

In present times, cheesecake still exists in multiple forms. German cheesecake is made with quark, a sour cream-like dairy product. Italian cheesecake depends on ricotta for its creamy base. Philadelphia’s is known for being lighter and creamier than other variations, while Chicago’s adds sour cream to enhance the texture. Some versions use water baths while others don’t involve baking at all, thanks to the use of gelatin to set the top layer. However, the most widely familiar—and most vehemently supported—version of cheesecake in America is the iconic New York cheesecake.
Arnold Reuben, owner of Reuben’s Restaurant and Delicatessen and The Turf Restaurant, is credited with creating the New York cheesecake in the 1920s. His cheesecake recipe, also known as Jewish cheesecake thanks to his heritage and the recipe’s kosher ingredients, was allegedly a favorite of actors and actresses seeking late night indulgence after shows.

In 1950, Junior’s opened in Brooklyn and has been a king among New York cheesecake makers ever since. “My grandfather said, ‘If you’re going to open a restaurant in New York, you’ve got to have great cheesecake,’” says Alan Rosen, third-generation owner at Junior’s.
Over the years, scores of restaurants and bakeries would follow this thought and tout their cheesecake as New York cheesecake. But what does that mean? That depends on whom you ask.
“New York cheesecake is pure, undiluted cheesecake,” says Eileen Avezzano, founder and owner of famed Eileen’s Special Cheesecake in Lower Manhattan, where New Yorkers have gotten their decadent fix for more than 35 years. “The ingredients are traditionally cream cheese, sour cream or heavy cream, fresh eggs, lemon, vanilla, a little sugar, and a graham cracker crust.” Some New York cheesecake spots, like Junior’s, forbid using sour cream. Allison Robicelli, co-owner of Robicelli’s Bakery, emphasizes preparation over ingredients. “It needs to be prepared in a hot water bath. That’s non-negotiable,” she insists. “Without the water bath it will overcook.” Allison also asserts that a cheesecake should sit a minimum of two days, but preferably four, giving it “time to age, which gives the cake the distinctive flavor and texture associated with New York style.” Another requirement? No toppings, swirls, or extra fuss allowed, thank you very much.

But cheesecake is NOT an English or American dessert… there are versions in nearly every culture.
German housewives adopted cheesecake as the dessert of choice for their weekly Kaffeeklatsch (coffee gossip) or Kaffee und Kuchen (coffee and cake). It has even been incorporated by many Jews into the observation of Shavuot, the commemoration of the giving of the Torah. Others say references to the “Land of Milk and Honey” in the Torah made consumption of dairy products permissible, therefore many eat dairy—especially cheesecake—to celebrate it now. We may never know the exact story, but one thing is for certain: cheesecake is a dessert belonging to all cultures.