Fudge History
Fudge is an American invention: most stories claim that the first batch of fudge resulted from an accident when a cook made a bungled batch of caramels.
One of the first documentations of fudge is in a letter written by Emelyn Battersby Hartridge, then a student at Vassar College in Poughkeepsie, New York. She wrote that a schoolmate’s cousin made fudge in Baltimore in 1886 and sold it for 40 cents a pound. She obtained the recipe, and in 1888, made 30 pounds of it for the Vassar Senior Auction. Word of the confection spread to other women’s colleges. Wellesley and Smith developed their own versions of this “original” fudge recipe.

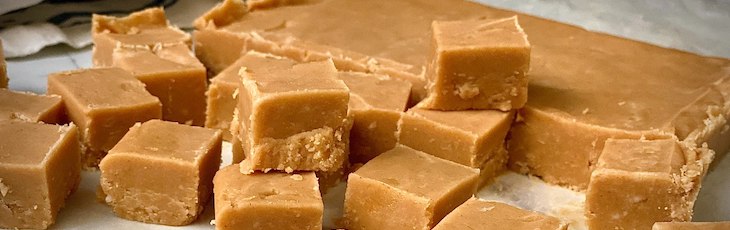
The recipe looks simple, right? Heat a mixture of sugar, butter and milk or cream to the soft-ball stage (224°-238°F), then beat it to a smooth, creamy consistency while it cools.
But it is easy to undercook or overcook a batch and to end up with “crystallized” fudge through insufficient stirring. As a result, “foolproof” recipes were developed for home cook that included corn syrup, which prevents crystallization and produces smooth fudge. Later recipes substituted sweetened condensed milk, marshmallow creme, or other ingredients for the milk/cream that were better guarantees of a perfect fudge texture. Today, commercial fudge recipes use a blend of techniques and ingredients to create fudge that has less chance of turning out grainy. It all has to do with controlling how the crystalline structure of sugar – and that can get pretty complicated. See the post below for a deep dive.
BEATING – THE SECRET TO GREAT FUDGE IS CANDY VIOLENCE
Once fudge has reached the soft ball temperature and it been removed from the heat, the hard work begins. (What is the soft-ball stage, you ask? See the post above!)
Sugar’s most comfortable position to exist is in crystal form. Even though the sugar melted and the whole glorious concoction is at the desired temperature, the sugar wants to return to being with the rest of its friends and form happy, crunchy crystals again. (I know. Sugar doesn’t really WANT anything. It’s just easier to think of crystallization that way).
Beating interrupts the process of sugar crystallization. It forces the supersaturated sucrose to form lots of tiny crystals rather than fewer big ones. In short, beating the fudge is what gives it your fudge the smooth, creamy texture you want so bad.
No matter what kind of fudge you are making, pour it out of the pot it cooked in and into a clean container. Let it cool slightly before moving on to the next step. Shoot for 110-113*F
CHEF TIP: do not scrape the sides of the pan you cooked the fudge in or the spoon used for stirring. They are often covered with a grainier layer of fudge.
Whe it is cooled down, with a clean utensil, stir constantly and vigorously until the mixture starts to thicken and its surface starts to look dull or matte. Once that happens, stop beating and pour the fudge into a mold.
In better confectionary shops, they always complete this step on a marble slab — the cool stone helps remove heat from the fudge more quickly. Marble isn’t necessary to make fudge, of course… but it does result in smoother, creamier fudge.

DON’T BE SURPRISED AT
- How long you have to beat the fudge
- How hard you have to beat the fudge
- How sore your arms will be the next day

TROUBLESHOOTING
Try not to stir while the sugar is cooking
Sugar and cream must be brought to a boil by gently stirring then – and this is very important – refrain from stirring again throughout the rest of the cooking process. Swirl the pan if you feel it necessary or if you believe milk is burning to the bottom of the pan.
Sugar crystallization by agitation will cause a chain reaction: if a crystal is present in the mixture, other sugar molecules will attach to it and the mixture may seize and become grainy.
Beware the sugar crystals on the sides of the pan
Use a pastry brush dipped in water to “wash” sugar crystals stuck on the sides of the pan. Do NOT use a whisk or spoon to just knock ’em down. They won’t dissolve; instead, they will form seed crystals and start a chain reaction that will make you sad. Very sad.
Don’t beat the fudge while it’s REALLY hot
After being cooked, the sugar must crystallize again to create fudge. This stage will determine the size of the sugar crystals. The sugar should ideally form small crystals that are barely discernible on the tongue. To achieve this, pour the mixture into a clean bowl, let the mixture cool for fifteen minutes, and THEN start beating it. It will thicken as it cools so when you beat the mixture, sugar molecules will have a tough time clinging to one another (it’s like trying to swim in molasses!). The result: crystals that form stay small.
You should beat the mixture when its temperature ranges from 110 to 113°F, which normally occurs fifteen minutes after the pan is removed from heat. The fudge is warm, but not burning hot.
There wasn’t enough fluid or fat to enable the sugar to dissolve
Oops. You either got a bad recipe or you didn’t follow it exactly. Regardless… shame on you.
Wet, goopy fudge
- TECHNIQUE: you didn’t cook the fudge to the soft-ball stage. You probably didn’t use a candy thermometer. Shame. Shame.
- RECIPE: too high a liquid to sugar ratio; try again with a recipe you didn’t find on Instagram but which has actual reviews.
- ENVIRONMENT: high humidity wrecks havoc on fudge. If you live in a naturally wet state like Florida, keep an eye on the amount of humidity. Cook the fudge longer at a lower temperature to adjust for 85% or higher humidity.
You burned yourself
- Use a wooden spoon next time. Wood conducts heat poorly.
- Be more careful. Melted sugar is MUCH hotter than boiling water. Seriously. Take out your earbuds and pay attention to what you are doing.

Cappuccino Fudge
Ingredients
- 2 tbsp instant espresso powder
- 1 ounce brewed espresso
- 4 ounces unsalted butter
- 200 grams granulated sugar
- 6 ounces heavy cream
- ½ tsp salt
- 12 ounces white chocolate chips
- 7 ounces marshmallow fluff
- 1 tsp vanilla extract
- ¼ cup dark chocolate covered espresso beans crushed
Instructions
- Prepare pan by lining it with aluminum foil and spraying the foil with nonstick cooking spray.
- In a small bowl, combine the instant espresso powder and brewed espresso, and stir until dissolved.
- Place butter, sugar, heavy cream, and salt in a heavy-bottomed medium saucepan over medium-high heat. Stir until the sugar dissolves and the butter melts.
- Continue to cook the fudge, stirring frequently, until it comes to a boil. Once boiling, insert a candy thermometer. Cook the fudge, stirring occasionally, until the thermometer reads 240°F.
- Once at 240°F, remove the pan from the heat and add the white chocolate chips and the marshmallow cream. Stir vigorously until the chips and cream are melted and incorporated. If necessary, return the fudge to the heat for brief periods to melt the chips. Add the vanilla and stir it in.
- Next, separate into a separate bowl approximately a quarter of the fudge for the white swirl.
- Add the reconstituted coffee to the remaining fudge in the pot, and stir until it is well-blended. Scrape the coffee fudge into the prepared pan.
- Working quickly, scoop spoonfuls of the white fudge and drop them on top of the coffee fudge in a random pattern, spreading them out evenly over the top. Once all of the white fudge is dotted on top, sprinkle crushed espresso beans all over, then swirl a knife through, creating a pattern of white and brown swirls.
- Let the Cappuccino Fudge cool and set completely at room temperature, then overnight in the fridge. Once set, lift it from the pan using the foil as handles and cut it into small squares using a large sharp knife.