Pieces Parts
Before you start a-slicing and a-dicing, it is important to be able to identify the parts of the knives you will be using. Why? Professional knives are the most basic part of the cooks arsenal. Imagine taking your car to a mechanic and hearing them say “hand me the spinny thing with the doober-doo on the top to remove this teeny square turn-around thing.” You wouldn’t trust that person with your car, right? In the same way, don’t expect me to trust YOU with a knife if you can’t recognize the difference between the blade and the belly. And for those interested in Culinary Arts as a career? You’re going to look pretty foolish if you can’t at least IDENTIFY the parts of the cook’s most essential tool.
There are ten parts of the knife you should be able to identify easily:
- Point
- Tip
- Belly
- Cutting Edge
- Heel
- Bolster
- Tang
- Rivets
- Scales
- Spine

The tools we use
Remember that mechanic who couldn’t identify his tools? Wow. What a dummy.
Don’t be that guy.
Our kitchen has five core tools you have to know the names of – the everyday tools you will become familiar with and use on a regular basis as long as you are a culinary student:
- Chef’s knife
- Boning knife
- Paring knife
- Offset serrated knife
- Honing steel
Each of the knives we use are made by Dexter-Russell and are designed by and for professional chefs. They aren’t fancy, but they get the job done and are of excellent commercial quality.


Using the honing steel
Every single time you pull out a chef’s knife, you should ALSO pull out a honing steel. We hone our knives EVERY SINGLE TIME we use them. This is the only possible way to keep our knives sharp and in good shape.
There are two basic ways to use a honing steel: Vertical and freehand.
How to hold a knife/ how to hold the product you are cutting
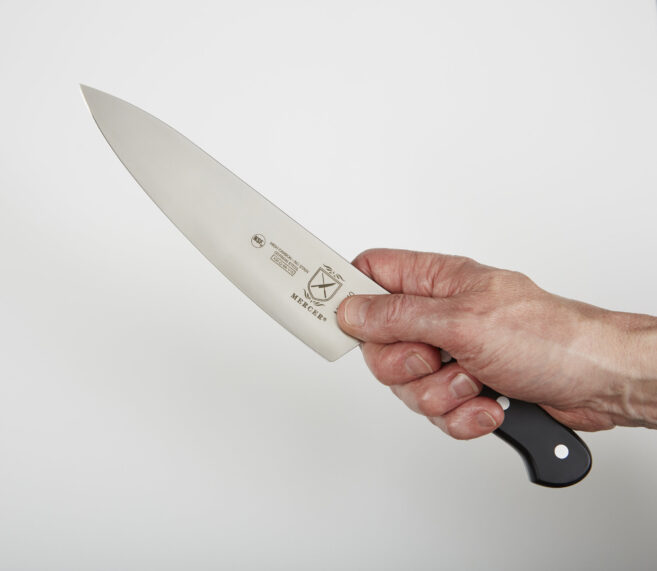
Knife Grip

The best way to hold a chef knife is the “pinch grip,” where you grasp the heel of the blade with your thumb and forefinger and wrap the remaining three fingers around the handle.
The pinch grip gives you better control, increasing cutting accuracy and speed while preventing slippage and lessening the chances of accidents.
Guide Hand

The opposite hand is used for holding and guiding the food you are cutting. All chefs curl in their fingers into a “claw” to avoid accidentally trimming off the tips of their fingers.
Always curl the fingertips of the opposite hand into a claw shape, never lay them flat.
Use the second joint of the opposite fingers as a guide for the knife blade to help control the thickness of the cut.
Here’s how the Culinary Arts students at Le Cordon Bleu are taught to use a chef’s knife:
Knife Safety
- Keep knives sharp
- Never cut anything in your hand
- Always use a stabilized cutting board
- NEVER try to catch a falling knife
- Clean knives separately, in a peg rack, blade down
- NEVER leave a knife in a full bus tub or sink of soapy water
- Carry knives tip down, blade back, parallel to your body
- Pass handle-first, blade down
- Use the correct knife for the task
- Pay attention!


Learn more
- Article: The history of the Chef’s Knife
- Link: Science of the Chef’s Knife
- Article: Types of Kitchen Knives and Their Applications
- Article: Anatomy of a Chef’s Knife