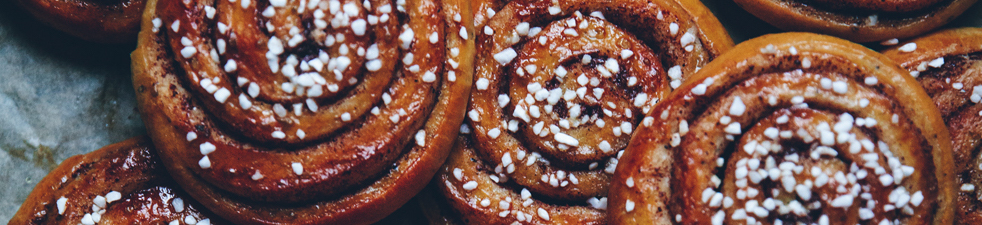
Most people look at a cinnamon roll and see a breakfast snack. Bakers look at these treats as what they TRULY are: a high-stakes engineering project.
We are about to dive into the world of Enriched Doughs—the heavy hitters of the bakery world. We’re talking about a dough so loaded with butter, eggs, and sugar that it shouldn’t even be able to rise, yet we’re going to force it to become the softest, most decadent thing you’ve ever tasted.
This isn’t just “baking”; it’s a masterclass in culinary sabotage. We are going to learn how to intentionally break the rules of bread-making to create that “shreddy,” pull-apart texture that defines a professional pastry. We’ll explore why a multi-billion dollar empire like Cinnabon uses scent as a psychological weapon to lure people through a mall, and why the difference between a “good” roll and a “legendary” one comes down to a few degrees of temperature and a scientific drizzle of heavy cream.
If you want to move beyond being a “cook” and start understanding the chemistry of comfort food—how to manipulate proteins, fats, and sugars to create something people will actually wait in line for—this is where it starts. Grab your scales; let’s build a masterpiece.

Phase 1: History, Flour, and Yeast
1. The Evolution of Enrichment: Engineering the Decadent Crumb
In professional baking, we divide the world into two camps: Lean Doughs and Enriched Doughs. A lean dough (like a baguette) relies on the pure, elastic strength of a gluten matrix formed by just flour, water, and salt. An enriched dough, however, is a deliberate act of “sabotage.” By introducing lipids, sugars, and dairy, we intentionally disrupt that gluten structure to create something softer, heavier, and more complex.
The cinnamon roll serves as the ultimate case study for this category. Its history is essentially a 500-year timeline of chefs pushing the limits of how much “extra” a dough can carry before the protein scaffolding collapses under the weight of its own luxury.
The 16th-Century: German Schnecken and the Invention of “Shortening”
Before the Renaissance, bread was a utility—a source of calories, not a culinary experience. The emergence of the German Schnecken (literally “snails”) marked the moment baking moved from survival to science.
- The Discovery of Shortening: Early bakers began experimenting by adding lard and butter into their yeast starters. They weren’t just chasing flavor; they were discovering the mechanical process of shortening. By coating flour proteins in fat, they physically prevented long gluten strands from forming. This “shortened” the bonds, transforming the tough, chewy texture of a peasant loaf into a tender, cake-like crumb.
- The Currency of Enrichment: In the 1500s, ingredients like refined white flour, cane sugar, and cinnamon were exorbitant luxuries. “Enriching” a dough was a literal display of socio-economic power. Back then, to buy and eat a Schnecken was to consume the most expensive chemistry a 16th-century bakery could produce.

The Scandinavian Transformation: Balancing the Matrix
As the technique migrated North, the Swedish Kanelbulle emerged, teaching us that high-fat doughs require an aromatic counter-balance to remain palatable.
- Aromatic Oils vs. Lipid Density: Swedish bakers integrated green cardamom, a spice that traveled to the North via Viking trade routes from the East. From a technical perspective, cardamom provides volatile oils that cut through the density of the butter. This creates a botanical “lift” that prevents a heavily enriched dough from feeling cloying or greasy on the palate.
- The “Shreddy” Structural Standard: While the goal was tenderness, the Scandinavians didn’t want a mushy product. They established the “shreddy” standard—using high-protein bread flour to create a reinforced “scaffolding.” This allowed them to load the dough with dairy while maintaining a specific elastic, pull-apart texture that is the hallmark of a masterfully handled enriched dough.

1985: The Cinnabon Revolution and Sensory Engineering
The American contribution to this timeline was the move from artisanal bread-making to precise food engineering. In 1985, the launch of Cinnabon shifted the objective from “spiced bread” to “molten confection.”
- The Liquid Fat Hybrid: American bakers began blending traditional butter with vegetable oils. While butter provides the essential flavor profile, oil remains liquid at room temperature. This ensures the dough stays soft and “pliant” for days, a massive technical departure from European rolls that firm up as the butter re-solidifies.
- Engineered Tenderness via Thermal Control: The modern “mall-style” roll relies on Strategic Under-Baking. While a standard loaf is baked to an internal temp of 200°F to set the structure, these rolls are pulled at 185°F. This keeps the eggs and dairy in a semi-set, custard-like state, creating a hybrid texture that sits halfway between a brioche and a pudding.
- The Salt-Sugar Contrast: The introduction of heavy cream cheese frosting wasn’t just for decadence; it was a solution to sensory fatigue. The high salt content in the frosting acts as a chemical foil to the extreme sugar levels, allowing the palate to process the intense enrichment without being overwhelmed.

Chef’s Insight: As you move into the bakery, remember that enrichment is a balancing act. Every gram of fat you add makes the dough more delicious, but it also makes the yeast work harder and the structure more fragile. You aren’t just following a recipe; you are managing a structural compromise between protein and fat.
Technical Comparison for the Advanced Student
| Technical Variable | Traditional Enriched (European) | Hyper-Enriched (American) |
| Fat Source | Primarily Solid (Butter) | Solid/Liquid Hybrid (Butter/Oil) |
| Hydration Level | Moderate (Milk) | High (Milk + Heavy Cream Drizzle) |
| Protein Goal | Visible Gluten “Shred” | Minimal Resistance / Custard-like |
| Maillard Timing | Baked to 200°F (Toasted/Nutty) | Pulled at 185°F (Moist/Pale) |

2. A Deep Dive into Flour: Protein v Performance
In professional baking, flour isn’t just an ingredient; it is the structural framework of your product. To understand why we choose a specific flour, we have to look at what is happening at the molecular level when we add moisture and agitation to wheat.
The Biology of the Scaffolding
All wheat flour contains two key proteins: Glutenin and Gliadin. The moment these proteins are hydrated and kneaded, they link together to form Gluten.
- Glutenin provides the elasticity (the ability of the dough to snap back).
- Gliadin provides the extensibility (the ability of the dough to stretch without tearing).
In a lean dough, like a baguette, creating this mesh is easy because there is nothing in the way. However, in our cinnamon rolls, we are introducing a massive amount of “sabotage” in the form of lipids (fats) and sugars. These ingredients physically get in between the protein strands, preventing them from bonding. This is why we need a high-protein flour—we need to start with a surplus of protein so that even after the fats have done their damage, there is still enough “scaffolding” left to hold the roll together.
The Strength Spectrum
The protein percentage in your flour dictates exactly how much weight your dough can carry before it collapses into a greasy puddle in the oven.

Cake Flour (6% – 8% Protein)
Best Use Case: Sponges and delicate, airy cakes.
Result in Cinnamon Rolls: The Structural Fail. It lacks the protein necessary to build a mesh. The heavy butter and sugar will simply crush the air cells, leaving you with a flat, dense disc rather than a spiral.

Pastry Flour (8% – 9% Protein)
Result in Cinnamon Rolls:The Collapse. This flour is designed for flakiness and “short” textures, not strength. It is far too tender to support the expansion of the yeast, resulting in a roll that falls apart the moment you try to slice or plate it.
Best Use Case: Pie crusts, tarts, and biscuits.

All-Purpose Flour (10% – 12% Protein)
Result in Cinnamon Rolls:The “Fair” Performance. You will achieve a soft bite, but you’ll miss out on that legendary “shreddy” loft. Because the protein is mid-range, the roll will feel more like a soft muffin and less like a professional, elastic, yeast-leavened pastry.
Best Use Case: Cookies and general everyday baking.

Bread Flour (12% – 14% Protein)
Result in Cinnamon Rolls:The Professional Standard. This provides the reinforced mesh needed to “trap” the gases from the yeast while holding up pounds of butter and sugar. It is the only choice for achieving that signature pull-apart, “shreddy” texture.
Best Use Case: Yeasted breads, artisan loaves, and high-fat rolls.
3. The Biological Struggle: Your Sugar is Starving Your Yeast
In a lean dough, yeast is the undisputed king of the hill. But in an enriched dough, you are asking yeast to perform a marathon while carrying a backpack full of lead. To understand osmotic pressure, just think of sugar as a sponge that is incredibly “thirsty.”
In a standard bread dough, yeast has plenty of water to drink so it can grow and produce the gas that makes bread rise. However, in a heavily enriched dough, the massive amount of sugar acts like a magnet, physically pulling water away from the yeast cells and trapping it. This puts the yeast under “osmotic pressure”—it’s essentially being dehydrated by the sugar surrounding it, which is why your cinnamon roll dough takes much longer to rise than a plain loaf of French bread.

- Sugar is Hygroscopic: Sugar doesn’t just sit there; it aggressively attracts water. In a high-sugar dough, the sugar actually sucks moisture right out of the yeast cells.
- The “Sugar Paralysis”: When yeast loses internal water to the surrounding sugar, its metabolism slows to a crawl. This is why enriched doughs require a much longer fermentation period.
- The Chef’s Strategy: We often use “Instant” or “Osmotolerant” yeast in these recipes. These strains are specifically engineered to stay active even when the sugar levels are high enough to dehydrate standard baker’s yeast. If you rush the proofing stage, you aren’t “saving time”—you are serving a dense, under-developed brick.

Phase 2: Pre-Production: Know your fats & Scald your milk
The Mechanics of Shortening: Fat is a Gluten SABOTEUR
In the world of professional baking, the term “shortening” is more than just a shelf-stable tub of white fat; it describes a specific chemical action that occurs when lipids (fats) interact with wheat proteins. As an advanced cook, you need to view fat as a structural disruptor that allows you to control the final “mouthfeel” of your bread.
1. The Molecular Barrier
To understand shortening, you have to visualize the birth of gluten. When water hits flour, the proteins (glutenin and gliadin) reach out to one another to form long, elastic chains.
When we add fat—whether it’s butter, oil, or lard—it acts as a physical barrier. Fat is hydrophobic (water-fearing). It coats the individual protein molecules, creating a slick film that prevents water from fully hydrating them. Because the proteins can’t get “wet” enough to link up effectively, they can only form tiny, fragmented chains. We have literally shortened the gluten strands.
2. Texture Control: Tender vs. Tough
The amount of shortening determines where your product sits on the texture spectrum:
- Lean Dough (Zero Shortening): Think of a baguette. Without fat to interfere, the gluten strands grow long and strong. This results in a chewy, “toothy” interior and a crisp, hard crust.
- Enriched Dough (High Shortening): In our cinnamon rolls, the high fat content ensures the gluten strands remain stubby and weak. This is what creates that cake-like, “melt-in-your-mouth” tenderness. Instead of fighting the bread (chewing), the bread gives way instantly.

3. Lubrication and the “Shreddy” Crumb
Shortening also provides lubrication. During the “oven spring” phase of baking, carbon dioxide gas expands rapidly. In a lean dough, the strong gluten walls resist this expansion. In an enriched dough, the fat-coated strands slide past one another with less friction.
This lubrication is what allows for the “shreddy” crumb. When you pull a high-quality cinnamon roll apart, it should peel away in long, thin, feathery sheets. This is the result of using Bread Flour (to provide enough initial protein) combined with a high percentage of shortening (to keep those strands lubricated and supple).
4. Shelf Life and Retrogradation
There is a secondary, non-structural benefit to shortening: moisture retention. Bread goes stale due to starch retrogradation (the starch molecules recrystallizing and pushing out water). Fat slows this process by surrounding the starch granules. This is why a brioche or a cinnamon roll remains soft for several days, while a baguette becomes a lethal weapon within twelve hours.
Chef’s Flour Tip: The All-Purpose Trap
If you attempt to make a heavily enriched dough with All-Purpose flour on a humid day, you are inviting disaster. All-Purpose flour already has shorter protein chains. When you add the “shortening” effect of butter and eggs to a low-protein base, the structure becomes so weak it can no longer support its own weight. The dough will feel like wet clay—sticky, limp, and impossible to shape. Bread Flour is your insurance policy. It provides a surplus of protein so that even after the fat does its work to shorten the strands, you still have enough structural integrity to maintain a professional spiral.
The Scalding Secret: Denaturing a Milky Saboteur
Before you mix your liquid into your flour, scald your milk.
In professional baking, scalding is the process of heating a liquid (usually milk) to a temperature of 180°F—just below the boiling point—and then cooling it back down before adding it to a recipe. This is sometimes about flavor… for bakers it’s about chemistry.
- The Whey Protein Problem: Raw or low-heat milk contains serum proteins that act as a “softener” for gluten. If you don’t kill these proteins with heat, they will dissolve your gluten scaffolding from the inside out, leaving you with a dough that feels “soupy” no matter how much bread flour you use.
- The Process: Heat the milk until small bubbles form around the edges (180°F), then immediately cool it to your Desired Dough Temperature (90°F–100°F). You have now denatured the “saboteur” proteins, ensuring your gluten stays strong.
Phase 3 – Bench Work: Friction and Spirals
1. Exactitude and precision: Desired Dough Temperature (DDT) & Friction Factor
Master Bakers don’t just “mix until it looks right.” They manage the Friction Factor.
- The Heat of the Hook: As your stand mixer’s dough hook kneads that heavy, high-protein flour, it generates significant kinetic energy which converts to heat.
- The Emulsification Break: If your dough temperature exceeds 105°F during mixing, the butter will begin to melt out of the “scaffolding” you are trying to build. Once the fat separates, it becomes a greasy mess that can no longer be integrated.
- Calculated Mixing: This is why we scald the milk but then cool it down. We are accounting for the friction of the mixer to ensure the final dough comes off the hook at exactly 78°F–82°F. This is the “sweet spot” where the butter stays solid enough to coat the proteins but the yeast is warm enough to wake up.
2. The Engineering of the Spiral
The way you roll and cut your dough determines if your final product looks like a professional pastry or a volcanic eruption.
- Surface Tension: When rolling the dough into a log, you need to pull the dough toward you slightly to create “tension” in the outer skin. This tension holds the shape during the final proof.
- Tight but not TOO tight: Reducing The “Cone Effect”: If you roll the dough too tightly, the CO2 gas produced by the yeast will have nowhere to expand but upward, pushing the center of your roll out like a volcano.
- The “Leaking” Problem: If you roll too loosely, the butter-sugar filling will liquefy and run straight out of the gaps before it has a chance to emulsify with the dough. So sad.
- The Cut: Avoid using a knife to cut raw enriched dough; the weight of the blade will likely compress the delicate air cells you just spent two hours growing. Use unflavored dental floss or a high-tension wire to “strangle” the dough, ensuring a perfectly circular, uncompressed cross-section. If you MUST use a knife, use a very sharp chef’s and gently slice, holding the sides to support the dough roll so it doesn’t “squish.”

Phase 4: The Bake
The Physics of the Drizzle: Managing High-Velocity Heat
When transitioning from a home kitchen to a commercial bakery, the game changes. You acan’t just set the temperature and walk away; you are managing a high-velocity wind tunnel. Commercial convection ovens use fans to circulate air, which makes heat transfer significantly more efficient, but also poses a massive risk of drying out your enriched dough.
In a home oven, the air is stagnant and dry. In our commercial kitchen, the convection fans create a high-velocity environment that can “set” the crust of a pastry far too quickly. This is where the heavy cream drizzle becomes a critical technical intervention.
- Combating the Fan: Convection ovens are notorious for stripping moisture off the surface of the dough, which leads to a thick, leathery crust. By pouring heavy cream over the rolls before loading the oven, you create a sacrificial layer of moisture. The fan evaporates the water in the cream first, creating a localized “steam shield” that keeps the dough skin supple so the rolls can achieve maximum Oven Spring.
- The “Gooey” Bottom (The Emulsion): In a commercial setting, we want a product that feels “molten.” As the water in the cream steams off, the remaining milk solids and fats melt into the cinnamon-sugar filling. This prevents the sugar from crystallizing into a hard candy at the bottom of the pan, keeping it in a permanent, emulsified syrup state.
- The Temperature Buffer: Because convection ovens cook about 25% faster than home ovens, the heavy cream acts as a thermal buffer. It protects the delicate fats in the dough from scorched edges while the center of the pan reaches the target internal temperature.

Convection Physics in the Commercial Oven: Time and Temp Control
Baking an enriched dough in a convection oven requires a lower temperature than a standard bread bake to ensure the center is cooked before the outside is charred.
- The Adjustment: If a home recipe calls for 350°F, we drop our commercial convection ovens to 300°F – 325°F and typically run the fan on Low if the oven allows it.
- The Pull Temp: Even with the high-efficiency heat of a commercial oven, our target remains 185°F internal.
- Pro-Tip: Use a thermocouple probe in the center-most roll. In a commercial environment, “golden brown” can be a lie—the fan can create a perfect exterior color while the interior is still raw dough. Trust the temperature, not your eyes.
The Browning Trap: Your Eyes Are Lying to You
In a commercial convection oven, browning is a race between two different chemical reactions. If you don’t know the difference, you’re going to pull raw rolls out of the oven just because they look dark.
- Caramelization (The Early Finisher): This is the browning of the sugars in your dough and filling. Because we’ve “hyper-enriched” this recipe, the sugar starts caramelizing at a much lower temperature. It provides a deep, dark color very early in the bake.
- The Maillard Reaction (The Flavor Engine): This is a more complex reaction between amino acids and sugars that creates the actual “baked bread” aroma and flavor. This happens faster on the outside because the convection fan is hitting the exterior with intense, direct heat.
The Danger Zone: Because of the high sugar content, your rolls will look like a dark, finished loaf of sourdough while the center is still literally raw, liquid dough. If you wait for the “perfect” golden-brown color you see in pictures, the sugar on the outside will be burnt and bitter, and the moisture inside will be gone.
The Professional Solution: Trust the Probe In a production kitchen, we don’t bake by “vibes” or color. We bake by data.
- The Rule: If the internal temperature hits 185°F, the protein scaffolding is set and the center is perfect.
- The Reality Check: The rolls might look darker than you expect, or they might look slightly pale depending on your fan speed. It doesn’t matter. Once you hit 185°F, pull them. Anything more is just drying out your profit margin.
Chef’s Note: Remember, the cream cheese frosting is going to cover the top anyway. We aren’t winning an award for “prettiest crust color”—we are winning the award for the most scientifically perfect, molten interior. Trust your thermocouple, not the window of the iCombi.
The Rule: Trust the Probe. If the internal temp is 185°F, the proteins are set. If you wait for it to look like a dark loaf of sourdough, the interior will be dry and the sugar will be burnt.
Phase 5: Quality Control, Avoiding Common Errors, & Recipe Execution
In professional baking, the transition from the mixing hook to the oven is where engineering often fails. To move from a “student” level to a professional standard, you must master the invisible physics of dough handling.
1. Technical Quality Checks: The Professional Standard
- The Windowpane Test (Verifying the Scaffolding): After 10 minutes of kneading, perform a windowpane test by stretching a small piece of dough into a square. The goal is a thin, translucent membrane that allows light through without tearing.
- Note: Because fat is a “gluten saboteur,” your windowpane might look slightly “shreddy” or textured compared to pizza dough. As long as it stretches significantly without immediate snapping, your scaffolding is ready.
- The Proofing Sweet Spot (Secondary Fermentation): Managing the second rise is a race against gas retention. Aim for the dough to be “nearly doubled” in size.
- The Test: The dough should be springy. When poked gently, it should leave a small indentation that slowly bounces back. If it collapses or doesn’t bounce, it is over-proofed and the structure will fail in the oven.
- The “Cinnabon” Thermal Profile (Strategic Baking): Professional mall-style rolls rely on strategic under-baking to maintain a molten core.
- The Setup: Set commercial convection ovens to 300°F – 325°F (350°F for home ovens) to prevent the sugars from scorching before the center sets.
- The Pull: Pull the rolls at an internal temperature of exactly 185°F.
- The Seal: Apply one-third of your frosting while the rolls are hot to “seal” the steam inside and keep the centers custard-like.
2. Let’s Not Do These Things… Common Mistakes Students Make
Surface Moisture (The “Dough Skin” Saboteur):
- The Mistake: Leaving dough uncovered on the bench.
- The Physics: Exposure to air creates a dry “skin.” This leather-like layer acts as a physical restriction, stunting your Oven Spring.
- The Fix: Always use oiled plastic wrap or a damp lint-free cloth during every rest period to keep the dough skin supple.
Pan Density (The Spacing Trap):
- The Mistake: Placing rolls too far apart on the tray.
- The Physics: Cinnamon rolls are a communal bake. If they don’t touch, heat hits all sides, evaporating moisture and turning a soft pastry into a hard, crusty bread.
- The Fix: Place rolls snug against each other so they proof into each other. This forces the rise upward and traps moisture in the sides for a “shreddy” texture.
The “Cinnamon Gap” (Hydrophobic Separation):
- The Mistake: Using a dry cinnamon-sugar sprinkle.
- The Physics: Cinnamon is hydrophobic (it repels water). A dry layer acts as a “non-stick” barrier, causing the center to pop out like a volcano—the Cone Effect.
- The Fix: Cream your cinnamon and sugar into softened butter to create a paste. This “glues” the spiral together during expansion.
Fat Incorporation (The Greasy Break):
- The Mistake: Adding butter too early in the mix.
- The Physics: Fat prevents glutenin and gliadin from bonding. Adding it before the scaffolding is built results in a greasy, un-incorporable mess.
- The Fix: Use the “Improved Mix” method. Build your gluten structure first, then slowly emulsify room-temp butter into the developed dough.
Cooling Profile (The Thermal Shock):
- The Mistake: Placing hot rolls in a cold draft or under an A/C vent.
- The Physics: Steam holds the roll’s volume. If hit by a cold draft, that steam condenses instantly, causing the structure to collapse and turn gummy.
- The Fix: Rest rolls in a warm, draft-free area for at least 10 minutes before finishing.
Chef’s Final Note: Whether you prefer the cardamom-scented elegance of the Swedish tradition or the molten indulgence of the American mall roll, the foundation remains the same: respect the yeast, control your temperatures, and always measure by weight.
Cinnabon-style Cinnamon Rolls
Ingredients
The Dough
- 20.25 oz Bread Flour ~4 ½ cups
- 8.6 oz Whole Milk Scalded and cooled (90-100°F), ~1 cup
- 3.5 oz Eggs Room temperature, 2 large eggs
- 2.0 oz Unsalted Butter Melted, ½ stick
- 1.8 oz Vegetable Oil ~¼ cup
- 1.0 oz Instant Vanilla Pudding Mix ~2 tbsp
- 2.3 oz White Sugar ~⅓ cup
- 0.3 oz Instant Yeast ~2 ½ tsp
- 0.2 oz Kosher Salt ~1 tsp
- 4.3 oz Heavy Cream Warmed (90°F), ~½ cup
The Filling
- 7.0 oz Brown Sugar Packed, ~1 cup
- 0.6 oz Korintji Cinnamon ~2 ½ tbsp
- 0.04 oz Ground Nutmeg ~½ tsp
- 4.0 oz Unsalted Butter Softened, 1 stick
Topping
- 4.0 oz Cream Cheese Softened, ½ cup
- 4.0 oz Unsalted Butter Softened, 1 stick
- 6.0 oz Powdered Sugar Sifted, ~1 ½ cups
- 0.15 oz Vanilla Extract 1 tsp
- 0.05 oz Kosher Salt ¼ tsp
Instructions
- Hydration & Proofing: Combine the warm milk (8.6 oz), butter (2.0 oz), oil (1.8 oz), sugar (2.3 oz), and a small portion of the flour. Stir in the yeast (0.3 oz) and allow to foam for 10 minutes.
- The Mix: Using the dough hook, incorporate the eggs (3.5 oz), salt (0.2 oz), pudding mix (1.0 oz), and the remaining bread flour (20.25 oz total).
- The Windowpane Test: Knead on low-medium for 10 minutes. The dough should be smooth and elastic.
- Bulk Fermentation: Cover and allow to rise in a warm environment until it has doubled in mass, approximately 60–90 minutes. Alternative: shape into a rough rectangle, wrap tightly, and allow to proof overnight in the refrigerator.
- Shaping: Roll into a 16×21-inch rectangle. Spread with the softened filling butter (4.0 oz) and sprinkle with the cinnamon-sugar mixture (7.64 oz total). Roll tightly and cut into 12 even cylinders.
- Second Proof & Drizzle: Place rolls in a greased pan and let rise for 30 minutes. Alternative: Wrap tightly and allow to proof overnight. Bring to room temperature and allow to proof for 30 minutes prior to baking.
- Right before baking, drizzle the warmed heavy cream (4.3 oz) over the rolls. This creates the signature self-basting syrup.
- The Bake: Preheat oven to 350°F. Bake for 15–20 minutes. Pro-Tip: To achieve the Cinnabon texture, pull the rolls when the internal temperature hits 185°F.
- Frosting: Whip the frosting ingredients and apply one-third while the rolls are hot to “seal” the moisture, and the remainder once they have slightly cooled.
Cinnamon Roll Lessons
Key Technical Terms
- Enriched Dough: A yeast dough containing high percentages of fat, sugar, and dairy, which “sabotages” gluten to create a tender, cake-like texture.
- Shortening (Process): The mechanical action of lipids (fats) coating flour proteins, physically preventing long gluten strands from forming.
- Osmotic Pressure: The force that occurs when high sugar levels pull moisture out of yeast cells, dehydrating them and slowing fermentation.
- Osmotolerant Yeast: A specific strain of yeast engineered to remain active in high-sugar environments where standard yeast would stall.
- Scalding: Heating milk to 180°F to denature whey proteins that would otherwise weaken the gluten structure.
- Desired Dough Temperature (DDT): The target temperature of the dough after mixing (typically 78°F–82°F), calculated to account for room temp, flour temp, and friction.
- Friction Factor: The amount of heat generated by the kinetic energy of the dough hook during the mixing process.
- Oven Spring: The final burst of expansion in the first few minutes of baking as the CO2 gas inside the dough heats up.
- Hygroscopic: The physical property of a substance (like sugar) to attract and hold water molecules from the surrounding environment.
- Maillard Reaction: The chemical reaction between amino acids and reducing sugars that creates the distinct savory-sweet flavor and aroma of baked bread.
- Caramelization: The browning of sugars caused by heat; in enriched doughs, this often happens faster than the dough can structurally set.
- Windowpane Test: A quality control check where a small piece of dough is stretched to see if it can form a translucent membrane without tearing, indicating gluten development.