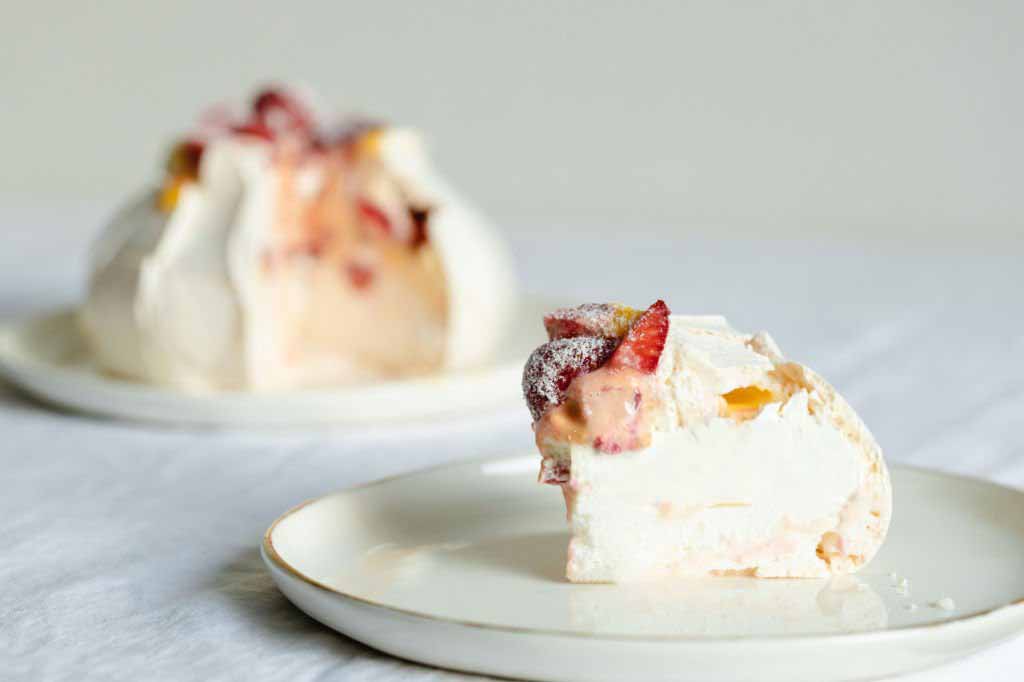
To the uninitiated, a Pavlova looks like a simple meringue. But to a chef, it is a structural marvel. Unlike its crunchy cousin, the French meringue, a true Pavlova is a study in contrasts: a crisp, eggshell-thin exterior that shatters upon entry to reveal a center as soft and marshmallowy as a cloud. It is the ultimate test of a pastry cook’s ability to manipulate air and sugar. If you can master the Pavlova, you’ve mastered the fundamental physics of the pastry station.

The Hundred-Year Fight: Ballerinas and Culinary Theft
The history of this dessert isn’t a polite tea-time story; it’s a century of international drama. Named after Anna Pavlova, a Russian prima ballerina so famous she was essentially the 1920s version of a global pop star, the dish is at the center of an obsessive “who-did-it-first” war between Australia and New Zealand.
New Zealand claims they invented it for her 1926 tour, citing a recipe found in a 1927 diary. Australia hit back, claiming a chef in Perth named it in 1935, famously declaring it “light as Pavlova.” The “scandal” got so heated that researchers have spent decades digging through hotel ledgers just to prove the other country was a thief. At one point, an Australian professor claimed the dish was actually a descendant of a German torte, effectively telling both countries they were fighting over stolen property. To this day, bringing up the “true” origin of Pavlova in a mixed crowd of Aussies and Kiwis is a guaranteed way to start an argument.
The Fine Dining Pavlova: From Noma to the Stars
In the world of Michelin stars, the Pavlova is a technical flex. Look at Chef René Redzepi at Noma. He doesn’t just put fruit on a meringue; he’s been known to infuse the meringue with foraged ants for a “citrus” pop or use sea buckthorn to create a neon-orange contrast against the snowy white base.
Then there is Chef Dominique Ansel (the guy who invented the Cronut). He created the “Mini Pav,” a version so structurally perfect it can be eaten with one hand, proving that if you understand the physics of the egg white protein lattice, you can take a 100-year-old recipe and turn it into a viral, modern sensation. In high-end banquet service at places like the Ritz-Carlton, you’ll see “Pavlova Walls”—hundreds of identical individual shells topped with gold leaf and micro-basil, showing that this “cloud” is a workhorse of the professional industry.

Food Science: The Physics of the Protein Lattice That Makes the Pavlova “Work”
To build a Pavlova, you are essentially building a skyscraper out of air and water:
A. Denaturation: Breaking the Fold
Egg whites are 90% water and 10% protein (mostly albumin). Normally, these proteins are folded into tight, curled balls. When you start whisking, you exert physical force that “uncoils” these proteins. This is called denaturation. As they uncoil, they expose two ends: one that loves water (hydrophilic) and one that hates it (hydrophobic).
B. The Air Trap
The hydrophobic ends of the protein strands quickly flee the water in the egg white by grabbing onto the air bubbles you are pumping into the mixture. This creates a protective “net” around every single air bubble.

C. The Hygroscopic Shield
Sugar is hygroscopic, meaning it pulls moisture toward itself. In a Pavlova, the sugar dissolves into the water film surrounding the air bubbles, turning that water into a thick, viscous syrup. This syrup acts as a reinforcement for the protein “net,” preventing the air bubbles from popping or merging.

4. The Starch & Acid Safety Net
In a Pavlova, the last step is to add some ‘insurance.” A pavlova’s insurance is cornstarch and an acid (vinegar or lemon juice). The acid lowers the pH, which makes the protein bonds more flexible and less likely to “over-coagulate.” Meanwhile, the cornstarch acts as an internal moisture sponge. As the Pavlova bakes, the starch swells and absorbs any liquid that the proteins try to kick out, creating the stable, marshmallowy, gooey center.

Let Me Help You Get it Right the First Time : Tips, Tricks, and Troubleshooting
Sure would be nice to have someone explain what to look out for, huh? Let me help you. I’ve made the mistakes already… you don’t need to! Here are the SIX THINGS YOU NEED TO KNOW BEFORE YOU START.
- The “Search and Destroy” Lipid Rule: Even a microscopic trace of fat (from a stray yolk or a greasy plastic bowl) acts as a structural assassin. Fat molecules are more attractive to the hydrophobic ends of protein strands than air is; if they find fat, they will bond to it instead of the air bubbles, and your skyscraper will never rise.
- The Professional Standard: Use a stainless steel or glass bowl (never plastic, which hides grease in scratches). Wipe the bowl and the whisk attachment with a cut lemon or a paper towel dipped in vinegar.
- If you drop even a speck of yolk into your whites, start over. You cannot “fish it out” well enough to save the lattice.
- The Sugar Siphon (Slow Integration): If you dump sugar in all at once, you aren’t just weighing down the bubbles; you are “drowning” the proteins before they can bond.
- How to Get it Right: Add sugar one tablespoon at a time, counting to ten between each addition. This allows the hygroscopic sugar to dissolve into the water film of the egg white, creating a stabilizing syrup.
- If the mixture looks dull or liquidy after adding sugar, you went too fast.
- The “Grain Test” (The Weep Prevention): The #1 cause of a “weeping” Pavlova (beads of syrup on the crust) is undissolved sugar.
- The Pro-Check: Stop the mixer and rub a small amount of the meringue between your thumb and forefinger. If it feels like fine sand, keep whisking. It must feel as smooth as silk. If you bake it while it’s still gritty, that sugar will turn into liquid in the oven and tunnel through your crust, causing a collapse.
- The Humidity Trap: Meringue is a “sugar sponge.” In Florida’s high humidity, the sugar in the Pavlova will literally pull water out of the air.
- Mistake to Avoid: Never make Pavlova on a rainy day if you can avoid it. If you must, increase your cornstarch by 20% to act as an internal “moisture insurance policy,” and move the finished shells to an airtight container the second they reach room temperature.
- The Thermal Shock Shield: Taking a Pavlova out of the oven the moment it’s done is the fastest way to shatter it. The sudden change from 200°F to a 75°F kitchen causes the air inside the bubbles to contract too quickly, pulling the crust inward.
- The Fix: Turn the oven off, prop the door open with a wooden spoon, and walk away. Let it cool for at least two hours—or overnight. Patience is a structural ingredient.
- Sensory & Visual Indicators to look for as you cook
- Visual: The raw mixture must look like glossy, high-end acrylic paint and hold a “bird’s beak” peak on the whisk.
- Auditory: Tap the side with a fingernail; it should sound like a hollow, dry drum.
- Tactile: The exterior should be bone-dry and fragile (like an eggshell), while the center should have a slight “give” when pressed, indicating the marshmallow interior is intact.

Recipe
Pavlova
Ingredients
The Meringue Base
- 225 g Egg Whites approximately 6 large eggs
- 350 g Caster Sugar Superfine, approximately 1.75 cups
- 10 g Cornstarch approximately 2 teaspoons
- 10 g Fresh Lemon Juice approximately 2 teaspoons
- 5 g Vanilla Extract approximately 1 teaspoon
- 1 g Fine Sea Salt approximately 1 small pinch
The Topping
- 600 g Heavy Cream Double Cream, approximately 2.5 cups
- 25 g Powdered Sugar approximately 2 tablespoons
- 500 g Fresh Berries approximately 3 cups
Instructions
- Pre-Flight Scour: Preheat your oven to 350°F (177°C). Wipe your stainless steel mixing bowl and whisk attachment with the cut side of a lemon to eliminate any residual lipids (fats) that could sabotage your foam.
- The First Aeration: Place the egg whites and sea salt in the scoured bowl. Whisk on medium speed until the albumin proteins denature and form soft, billowy peaks.
- The Sugar Bridge: With the mixer running, add the caster sugar one tablespoon at a time. Do not rush this step; the sugar needs time to dissolve into the water of the whites to create a stable, hygroscopic syrup.
- The Grain Test: Continue whisking on medium-high until stiff, glossy peaks form. Rub a small amount of the meringue between your thumb and forefinger; if it feels gritty, continue whisking until perfectly smooth.
- Stabilize: Gently fold in the cornstarch, lemon juice, and vanilla extract using a silicone spatula until just combined.
- Shape the Structure: Scrape the meringue onto a parchment-lined baking sheet. Shape into an 8-inch disc or individual 3-inch nests. Use a spatula to draw deep vertical grooves up the sides to provide structural reinforcement during the bake.
- The Flash Start: Place the pavlova in the 350°F oven and immediately turn the temperature down to 200°F (93°C). This initial "heat shock" sets the eggshell-thin crust while the lower temp cures the marshmallow center.
- The Cure: Bake for 90 minutes. Do not open the oven door during this time.
- Thermal Descent: Turn the oven off and prop the door open with a spoon or rolled up washcloth. Allow the pavlova to cool completely inside the oven (at least 2 hours) to prevent structural cracks caused by thermal shock.
- Service Assembly: Whip the heavy cream and powdered sugar to soft peaks. Top the cured meringue with the cream and berries. Serve within 30 minutes of assembly to prevent the moisture from dissolving the protein lattice.
Notes
- Hygroscopic Shield: Caster sugar is mandatory because its smaller surface area allows it to dissolve quickly into the egg white moisture before the proteins over-coagulate.
- The Lipid Rule: Even a trace of yolk or grease will prevent the hydrophobic ends of the protein strands from bonding with air, resulting in a flat, dense disc.
- Storage: Meringue shells can be stored in an airtight container for up to 3 days in low-humidity environments. In Florida, assembly must happen immediately before service.

The Evolution of the Cloud: Iconic Iterations
While the classic Pavlova is a snowy white mound with tropical fruit, the dish has evolved into several distinct “stamped” versions that every professional should recognize:
The “Savory” Pavlova: A modern fine-dining trend where the sugar is slightly reduced and the meringue is infused with beet powder or charcoal, topped with goat cheese mousse and balsamic-macerated strawberries. This iteration tests the boundaries of the “dessert” category and is frequently seen in “blind tasting” culinary competition

The Chocolate Marbled Pavlova: Popularized by Nigella Lawson, this version involves folding high-quality cocoa powder or melted dark chocolate into the stiff meringue at the very last second. This creates a “tiger-stripe” effect. Technically, this is difficult because the fat in the chocolate threatens the stability of the protein lattice; it requires a high-speed “swirl and stop” technique to prevent collapse.
The “Nanterre” Nesting Ring: Instead of a single cake, the meringue is piped into small, interlocking rounds to form a wreath. This mimics the shape of the famous French Brioche Nanterre. In catering, this allows a chef to place different curd flavors (lemon, passionfruit, raspberry) in each individual “well” of the wreath, creating a multi-flavor centerpiece.

The Eton Mess (The “Failure” Iteration): Every chef needs to know that the Eton Mess—a classic English dessert of crushed meringue, cream, and strawberries—is essentially a Pavlova that met with a tragic accident. Legend says it was created when a Pavlova was crushed by a dog at an Eton College cricket match. It proves that even when the structural engineering of a meringue fails, the flavor profile remains a high-value asset.

Making Pavlovas for a Crowd: This, Not That
For a Mustang Catering Event, the difference between a successful dessert course and a disaster is your assembly-line logic:
- THIS: The Individual Nest. Pipe fifty 3-inch portions using a large plain tip. They dry faster, are easier to count for inventory, and ensure every guest gets a pristine “shatter” moment.
- NOT THAT: The Family-Style Giant. Never bake a massive Pavlova for a banquet. It is impossible to slice cleanly for a crowd; you will end up serving “meringue rubble” that looks like a mistake.
- THIS: The “Deconstructed” Build. Keep your components separate until the order is “fired.” Use a piping bag for the whipped cream to maintain speed and portion control.
- NOT THAT: Early Assembly. Never top a Pavlova more than 30 minutes before it hits the table. The hygroscopic nature of the sugar will pull moisture from the cream, dissolving your protein skyscraper into a soggy puddle.
The Move: Off-Property Logistics
Transporting Pavlova is the ultimate test of a catering manager’s nerves. You are essentially moving “sweet glass” through the Florida humidity.
- The Container Strategy: Transport fully cured shells in airtight Cambros or plastic bins. Place a single layer of parchment between levels, but do not stack more than three high. Use clean, dry kitchen towels at the base to act as “shock absorbers” against van vibrations.
- The Florida Rule: Do not open your airtight bins until you are inside the venue’s climate-controlled space. If you assemble in an outdoor tent, your “Cloud” will turn into a “Sticky Marshmallow” in under 20 minutes.
- The Assembly Line: Carry your heavy cream and fruit in a chilled cooler. Always whip your cream on-site using a portable hand mixer or a balloon whisk. Pre-whipped cream loses its volume during transit and will weep into the meringue base.

Terms and Techniques – Here are the Things You Should Know Now
Technical Vocabulary
- Albumin: The primary protein found in egg whites that allows for foam formation.
- Denaturation: The process of uncoiling proteins through physical or chemical means (like whisking or adding acid).
- Hygroscopic: The property of a substance (like sugar) to attract and hold water molecules from the surrounding environment.
- Weeping: When sugar syrup leaks out of a meringue, usually caused by undissolved sugar or high humidity.
Study Guide: Concepts for Mastery
- The Fat Rule: Lipids (fats) physically prevent the protein-to-air bond; clean gear is mandatory for foam stability.
- The pH Factor: Acid stabilizes egg whites by preventing the proteins from bonding too tightly and squeezing out water.
- The Sugar Timing: Why sugar must be added slowly to protect the protein lattice rather than drowning it.
- The Moisture Sponge: How cornstarch absorbs liquid during the baking process to create the soft interior.
- Safe Service: Identify the cold-holding requirements for whipped cream toppings (ServSafe).